Continuity Web
Getting Started
Episodics
Adding Episodes
Viewing Multiple Episodes
Episodics: Traditional vs. Like a Feature
Season Data Transfer
Logging In With Your EP Account
Register for SyncOnSet
Creating a Production and Initial Script Breakdown
Revising a Script
Accessing My Productions
Production Homepage Overview
Production Security
Managing Users and Permissions
Working on a Shared Breakdown
Multi-Department Views
Free Trials
Lite Plan for Features
Student Productions
Universal Search
Adding Notes
Managing Approvals
Calendar View
SyncOnSet Best Practices for COVID Compliance
The New and Improved SyncOnSet
Scenes
Scene Index Overview
Customizing the Scene Index
Managing Scenes
Managing Script Locations
Adding and Updating Shoot Dates
Scene View Overview
Adding Characters to a Scene
Inventory
Inventory Overview
Managing Inventory
Customizing the Inventory Index
Character Closets
Adding and Deleting Inventory
Inventory Reports
The New and Improved Inventory
Tracking Assets in Continuity
Characters and Sets
Character Index Overview
Character View Overview
Principal Characters with Multiple Numbers
Adding and Removing Background
Adding and Removing Principal Characters
Linking and Merging Characters
Deleting a Character
Set Index Overview
Set View Overview
Adding and Removing Sets
Changes and Looks
The New and Improved Changes and Looks
Changes Overview
Building a Change
Adding and Removing Changes
Editing and Inserting Changes
Bag Tags/Change Labels
Looks Overview
Building Looks for HMU
Adding and Removing Looks
Actors
Actor Index Overview
Creating Actors and Assigning Actors to Characters
Actor View Overview
The New and Improved Actors
Gallery
Gallery Overview
Uploading and Tagging Photos
Sorting and Filtering the Gallery
Printing & Sharing Photos
Wrap, Continuity Book, and Reports
Continuity Mobile
Getting Started
[Mobile] Logging In With Your EP Account
What's New in 5.5.0?
[Mobile] Home Page
[Mobile] App Settings
[Mobile] Multi-Department View
[Mobile] Syncing
[Mobile] Universal Search
[Mobile] Switching Productions and Multi-Episode View
[Mobile] Adding Notes
[Mobile] Permissions
The New and Improved Mobile App
Mobile App Overview
[Mobile] Upgrading to SyncOnSet 5.0
Scenes
Inventory
[Mobile] Inventory Overview
[Mobile] Character Closets
[Mobile] The New and Improved Inventory
[Mobile] Managing Inventory
[Mobile] Adding and Removing Inventory
Characters + Sets
[Mobile] Character Index Overview
[Mobile] Character View Overview
[Mobile] Viewing Characters by Scene
[Mobile] Sets Overview
[Mobile] Viewing Sets by Scene
Changes & Looks
[Mobile] Adding and Removing Changes
[Mobile] Building A Change
[Mobile] Printing Bag Tags
[Mobile] Adding and Removing Looks
[Mobile] Building Looks for HMU
The New and Improved Changes and Looks for Mobile
Wrap
Actors
Photos
Budgeting and Money Tracking
Budgeting
Budget Overview
Creating an Amort Episode
Budgeting for Costume
Budgeting for Miscellaneous
Budgeting for Props
Budgeting for Set Dec
Budget and Money Tracking Best Practices
Budget Reports
Money Tracking
FAQs
Troubleshooting Guides
Cannot Edit Production
Scenes/Characters Missing After Breakdown
Unable to Sync
Missing Photos
Miscellaneous Groups Don’t Match
Bag Tag Printing Skips Labels
Reports Skipping Pages
Editing the Name of a Script Revision
Web Browser is Slow
Product Updates
AssetHub
Getting Started
Managing Assets
Creating Assets
Creating Assets by Exporting Inventory from SyncOnSet
Creating Assets Manually
Creating Assets with Asset Import
Reconciling Single Transactions as Assets
Reconciling Journal Entries
Handling Returns
Bulk Reconciling Transactions
Bulk Updating
Excluding Transactions
Splitting Transactions
Splitting/Duplicating Assets
Merging Assets
Adding Photos to an Asset
Uploading Documents to an Asset
Choosing the Correct Disposition
Creating Storage Locations and Sub Locations
Additional Features
Running Reports (Asset Pages, CSV, PDF, Asset Disposition Report)
Searching and Filtering Assets
Creating, Editing, and Deleting Characters and Sets
Moving Assets Within AssetHub
Managing Groups
Trashing Assets
Requests and Approvals
Accessing AssetHub on a Mobile Device
Using Barcodes with Assets
AssetHub Best Practices for COVID Compliance
Features and Series
Accounting
Accounting Onboarding
Locking Currencies
Exporting Asset Reports from SmartAccounting
Exporting Asset Reports from Global Vista
Exporting Asset Reports from PSL
Uploading Ledgers
Matching Columns
Handling POs
Production Coordinator
Crew
Adding Project Users and Managing Permissions
User Permission Levels
Studios and Divisions
Creating Division Assets
Managing Events
Adding Studio Users and Managing Permissions
Customizing Fields Within Departments
Troubleshooting Guides
Webinars
All SyncOnSet Webinars
Introduction to SyncOnSet Continuity Web: Script Breakdown, Revisions, Linking and Deleting Characters
SyncOnSet Continuity Web for Costume
SyncOnSet Budgeting for Costume
Advanced SyncOnSet: Best Practices & Pro Tips
SyncOnSet for Production Coordinators
SyncOnSet Continuity for Episodic Teams: Block Shooting & Cross-boarding, Characters, Actors, and Inventory
SyncOnSet 5.0 Mobile App: Navigation, Uploading and Tagging Photos
SyncOnSet Continuity Hair & Makeup
SyncOnSet Continuity for Set Dec: Using the Mobile App
Budgeting & Money Tracking for Costumes
Budgeting & Money Tracking for Set Dec
SyncOnSet for Episodics: Season Data Transfer
SyncOnSet for Props: Introduction to Continuity & Budgeting (Web)
Transitioning to SyncOnSet 5.0 Mobile
SyncOnSet for Costumes: Adding Inventory, Changes, and Photos in Continuity Web
SyncOnSet for Students: Intro to Continuity Web
SyncOnSet Continuity Web: Production-Wide Account Basics
All AssetHub Webinars
Introduction to AssetHub 4.0: Demo
AssetHub: Managing Permissions & Adding Team Members
AssetHub: Managing Journal Entries, Returns, Merging, and Bulk Updating
Exporting Inventory from SyncOnSet to AssetHub
Webinars for Costume
Webinars for Hair and Makeup
Webinars for Props
Webinars for Set Dec
Table of Contents
- All Categories
- AssetHub
- Managing Assets
- Additional Features
- Creating, Editing, and Deleting Characters and Sets
Creating, Editing, and Deleting Characters and Sets
 Updated
by Jennifer Sneider
All users can access this feature.
There are two sections under Characters and Sets: Master and Project.
The Master section is where you can view all Characters or Sets in your production, while the Project section breaks these Characters or Sets down by a specific season or Project.
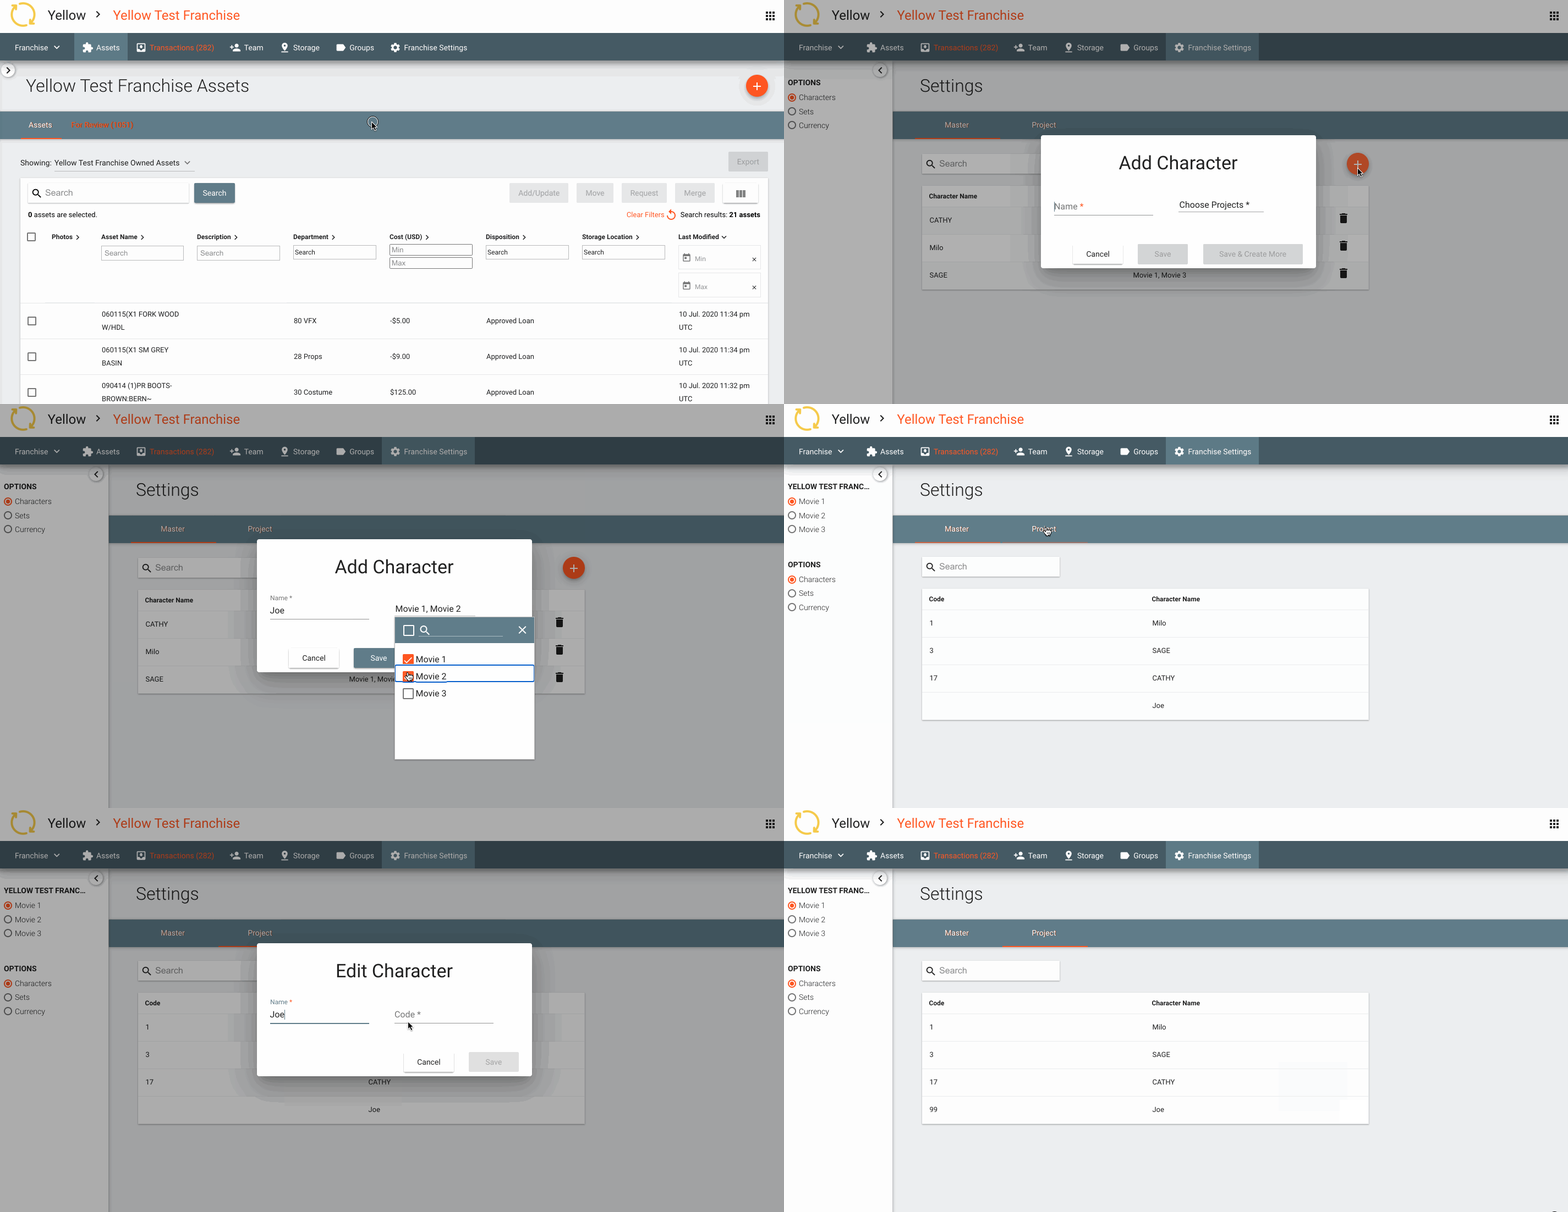
Creating Characters and Sets
- While logged in to a Series or Feature, click Series Settings or Feature Settings on the top navigation bar.
- Select Characters or Sets in the Options menu. If you don't see the menu, click the Caret to open the collapsible toggle.
- Click the orange (+) button on the Master tab.
- In the pop-up window, enter the name of your Character/Set and click Choose Projects to open a drop down menu.
- Make a selection by clicking the checkbox in line with the Project(s) (you can select multiple).
- Click Save if you are done or Save & Create More to clear the fields and continue creating more Characters/Sets.
- Character and Set codes should populate automatically with your ledger, but if you need to assign codes to your Characters/Sets, follow Steps 6-8.
- Click Project and select a specific Project in the Options menu in the sidebar.
- Click the line of the Character/Set you want to assign a code to.
- In the pop-up window, enter the code and click Save.

Editing Characters and Sets
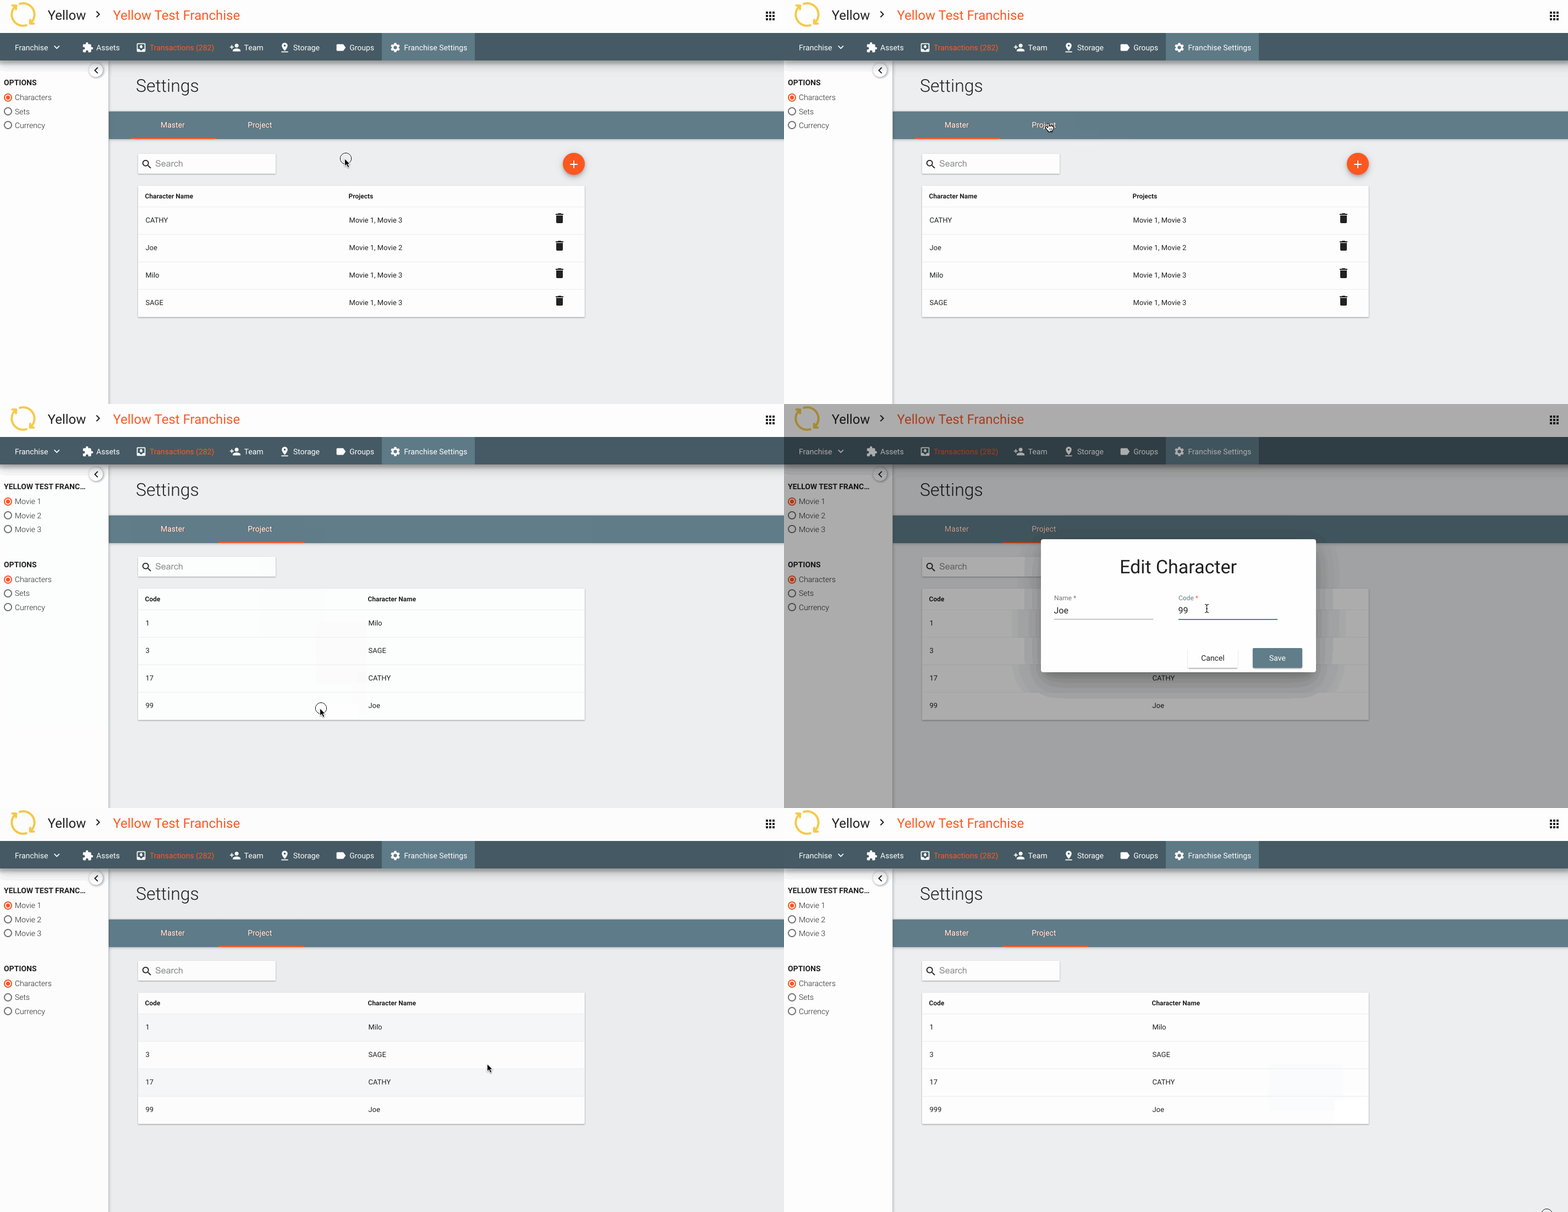
Editing Character/Set Name or Code within a Project
- While logged in to a Series or Feature, click Series Settings or Feature Settings on the top navigation bar.
- Select Characters or Sets in the Options menu. If you don't see the menu, click the Caret to open the collapsible toggle.
- Click Project on the secondary navigation bar.
- Click the line of the Character/Set you want to edit.
- In the pop-up window, rename your Character/Set or update the code and click Save.

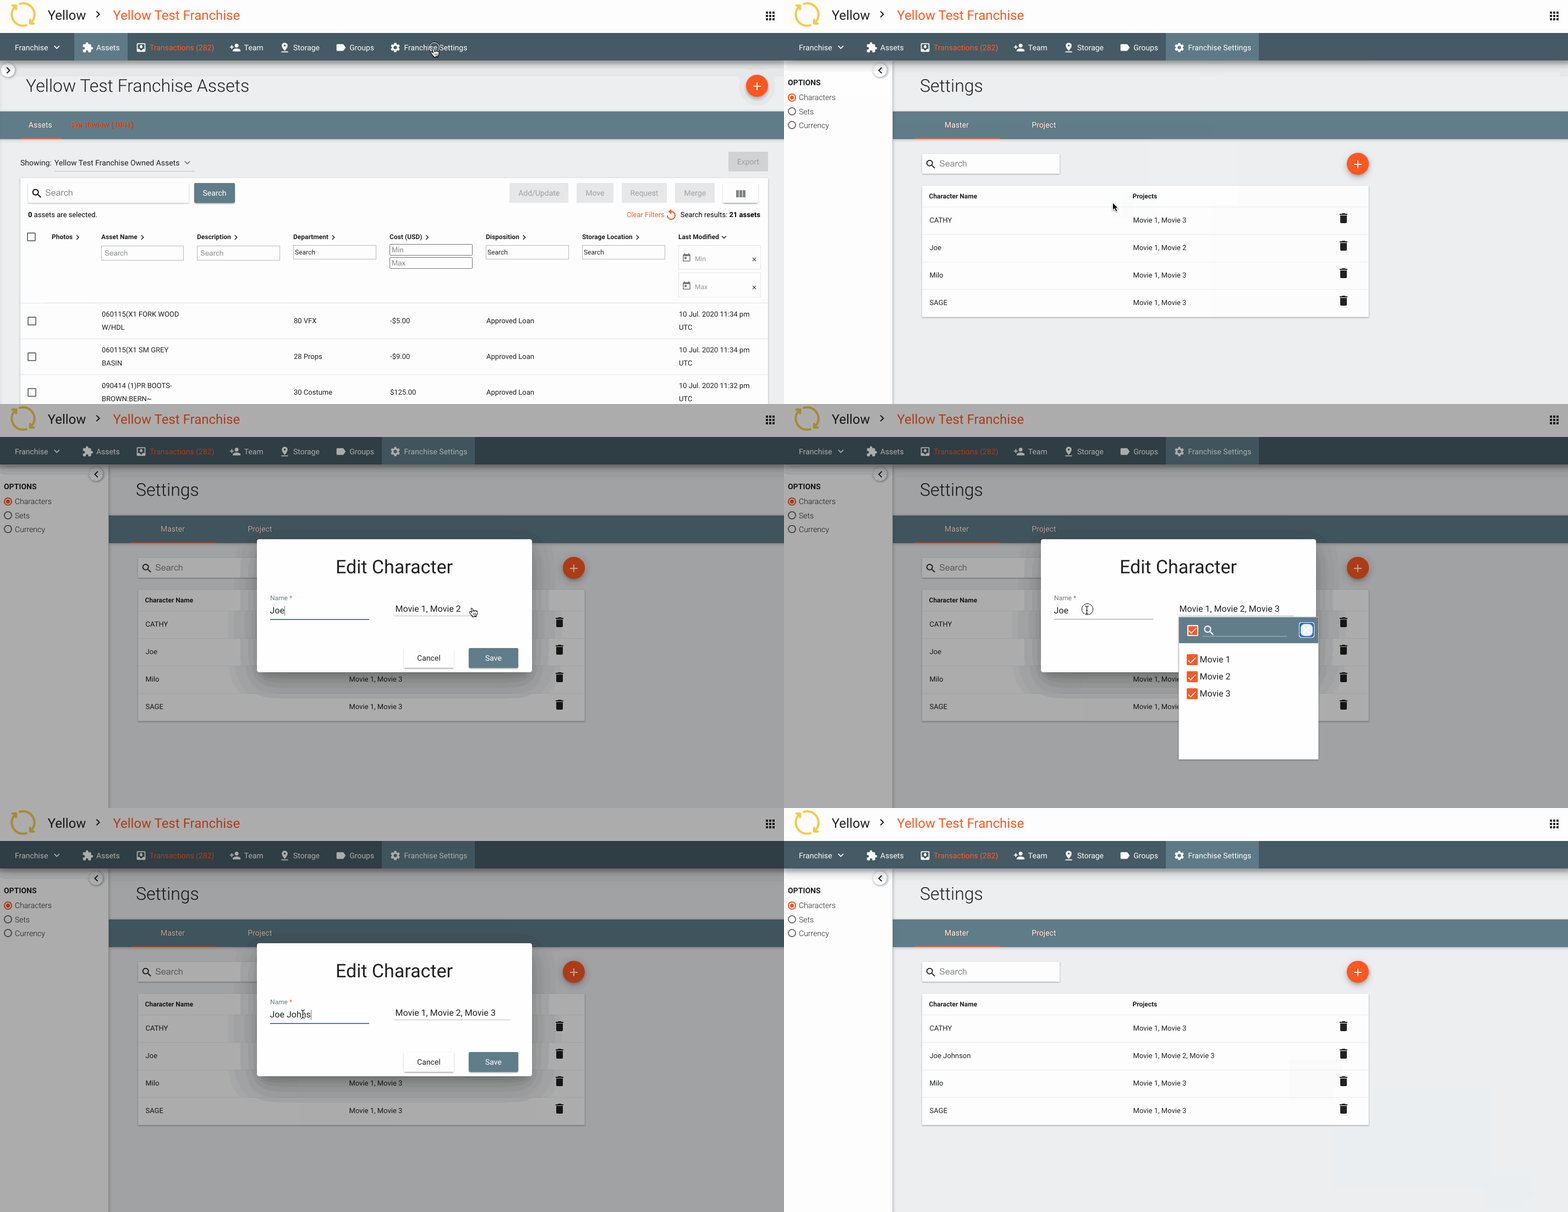
Editing Master Character/Set Name or Project
- While logged in to a Series or Feature, click Series Settings or Feature Settings on the top navigation bar.
- Select Characters or Sets in the Options menu. If you don't see the menu, click the Caret to open the collapsible toggle.
- Click Master on the secondary navigation bar.
- Click the line of the Character/Set you would like to edit.
- In the pop-up window, rename your Character/Set and/or move it to a different Project and click Save.

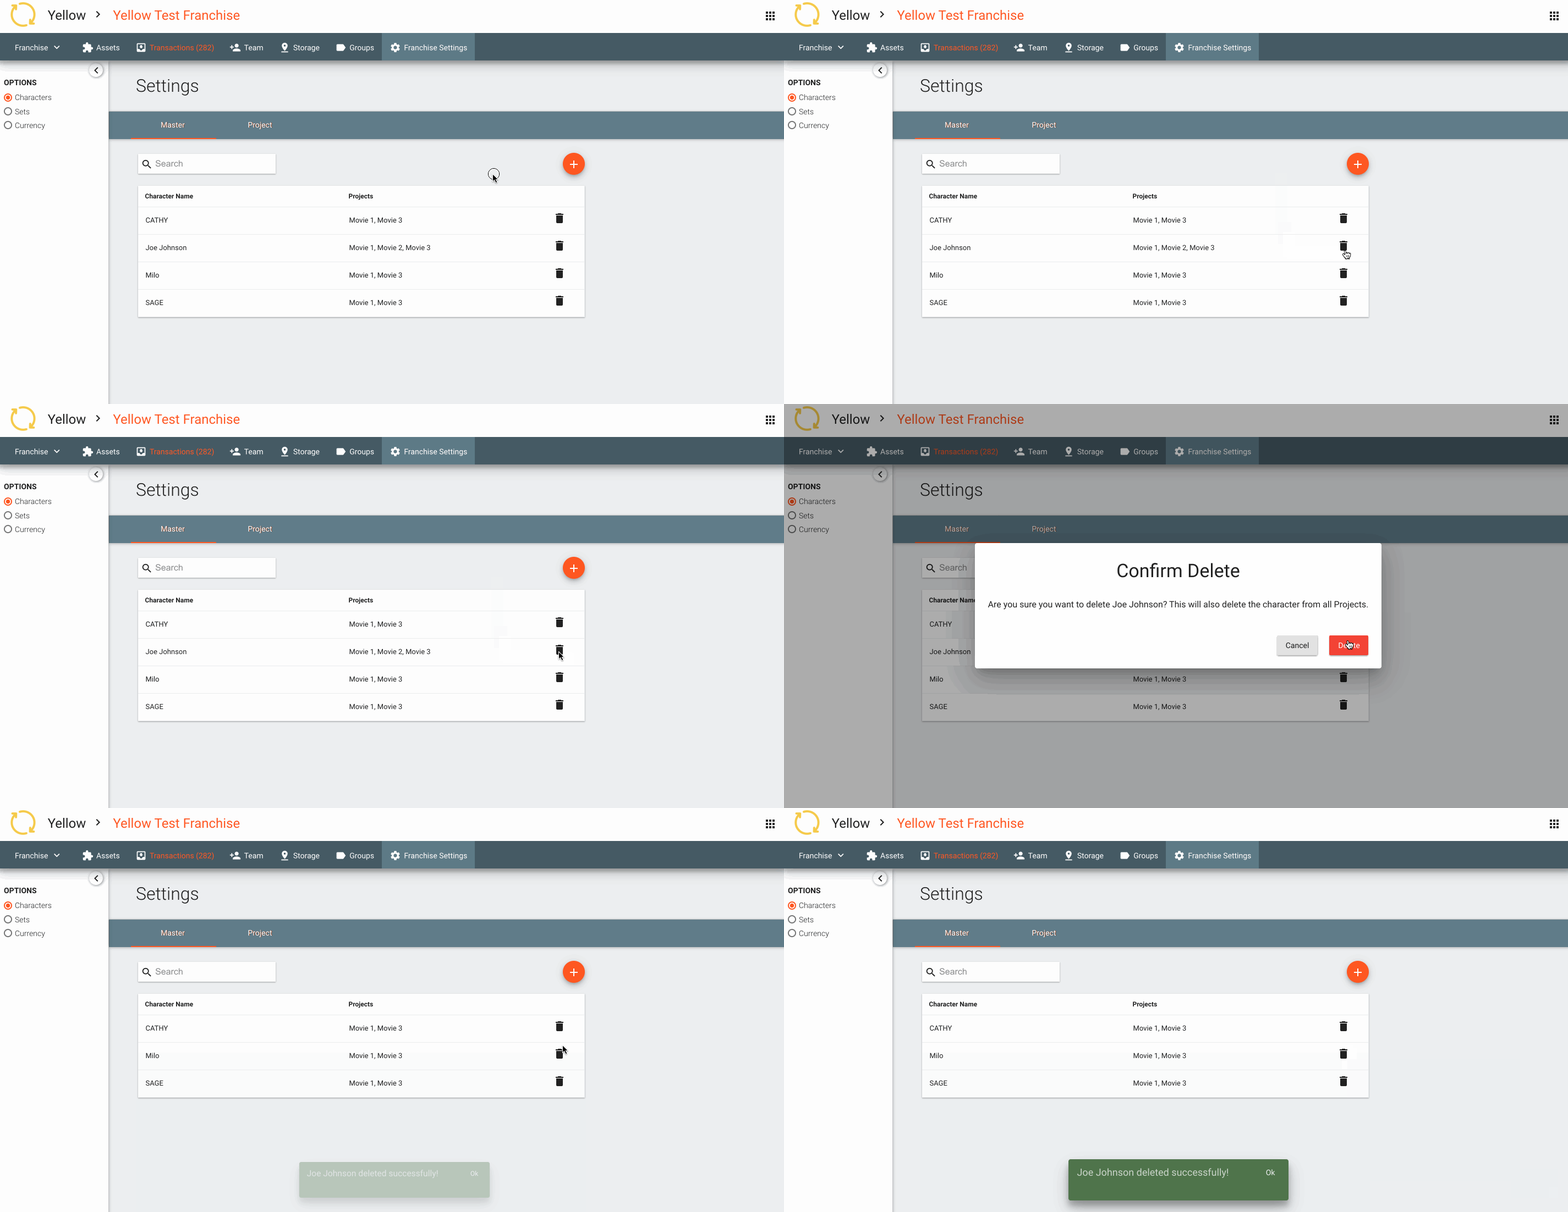
Deleting Characters and Sets
- Click the Trash Can icon in line with the Character/Set you would like to delete.
- Click Delete to confirm.

