Continuity Web
Getting Started
Episodics
Adding Episodes
Viewing Multiple Episodes
Episodics: Traditional vs. Like a Feature
Season Data Transfer
Logging In With Your EP Account
Register for SyncOnSet
Creating a Production and Initial Script Breakdown
Revising a Script
Accessing My Productions
Production Homepage Overview
Production Security
Managing Users and Permissions
Working on a Shared Breakdown
Multi-Department Views
Free Trials
Lite Plan for Features
Student Productions
Universal Search
Adding Notes
Managing Approvals
Calendar View
SyncOnSet Best Practices for COVID Compliance
The New and Improved SyncOnSet
Scenes
Scene Index Overview
Customizing the Scene Index
Managing Scenes
Managing Script Locations
Adding and Updating Shoot Dates
Scene View Overview
Adding Characters to a Scene
Inventory
Inventory Overview
Managing Inventory
Customizing the Inventory Index
Character Closets
Adding and Deleting Inventory
Inventory Reports
The New and Improved Inventory
Tracking Assets in Continuity
Characters and Sets
Character Index Overview
Character View Overview
Principal Characters with Multiple Numbers
Adding and Removing Background
Adding and Removing Principal Characters
Linking and Merging Characters
Deleting a Character
Set Index Overview
Set View Overview
Adding and Removing Sets
Changes and Looks
The New and Improved Changes and Looks
Changes Overview
Building a Change
Adding and Removing Changes
Editing and Inserting Changes
Bag Tags/Change Labels
Looks Overview
Building Looks for HMU
Adding and Removing Looks
Actors
Actor Index Overview
Creating Actors and Assigning Actors to Characters
Actor View Overview
The New and Improved Actors
Gallery
Gallery Overview
Uploading and Tagging Photos
Sorting and Filtering the Gallery
Printing & Sharing Photos
Wrap, Continuity Book, and Reports
Continuity Mobile
Getting Started
[Mobile] Logging In With Your EP Account
What's New in 5.5.0?
[Mobile] Home Page
[Mobile] App Settings
[Mobile] Multi-Department View
[Mobile] Syncing
[Mobile] Universal Search
[Mobile] Switching Productions and Multi-Episode View
[Mobile] Adding Notes
[Mobile] Permissions
The New and Improved Mobile App
Mobile App Overview
[Mobile] Upgrading to SyncOnSet 5.0
Scenes
Inventory
[Mobile] Inventory Overview
[Mobile] Character Closets
[Mobile] The New and Improved Inventory
[Mobile] Managing Inventory
[Mobile] Adding and Removing Inventory
Characters + Sets
[Mobile] Character Index Overview
[Mobile] Character View Overview
[Mobile] Viewing Characters by Scene
[Mobile] Sets Overview
[Mobile] Viewing Sets by Scene
Changes & Looks
[Mobile] Adding and Removing Changes
[Mobile] Building A Change
[Mobile] Printing Bag Tags
[Mobile] Adding and Removing Looks
[Mobile] Building Looks for HMU
The New and Improved Changes and Looks for Mobile
Wrap
Actors
Photos
Budgeting and Money Tracking
Budgeting
Budget Overview
Creating an Amort Episode
Budgeting for Costume
Budgeting for Miscellaneous
Budgeting for Props
Budgeting for Set Dec
Budget and Money Tracking Best Practices
Budget Reports
Money Tracking
FAQs
Troubleshooting Guides
Cannot Edit Production
Scenes/Characters Missing After Breakdown
Unable to Sync
Missing Photos
Miscellaneous Groups Don’t Match
Bag Tag Printing Skips Labels
Reports Skipping Pages
Editing the Name of a Script Revision
Web Browser is Slow
Product Updates
AssetHub
Getting Started
Managing Assets
Creating Assets
Creating Assets by Exporting Inventory from SyncOnSet
Creating Assets Manually
Creating Assets with Asset Import
Reconciling Single Transactions as Assets
Reconciling Journal Entries
Handling Returns
Bulk Reconciling Transactions
Bulk Updating
Excluding Transactions
Splitting Transactions
Splitting/Duplicating Assets
Merging Assets
Adding Photos to an Asset
Uploading Documents to an Asset
Choosing the Correct Disposition
Creating Storage Locations and Sub Locations
Additional Features
Running Reports (Asset Pages, CSV, PDF, Asset Disposition Report)
Searching and Filtering Assets
Creating, Editing, and Deleting Characters and Sets
Moving Assets Within AssetHub
Managing Groups
Trashing Assets
Requests and Approvals
Accessing AssetHub on a Mobile Device
Using Barcodes with Assets
AssetHub Best Practices for COVID Compliance
Features and Series
Accounting
Accounting Onboarding
Locking Currencies
Exporting Asset Reports from SmartAccounting
Exporting Asset Reports from Global Vista
Exporting Asset Reports from PSL
Uploading Ledgers
Matching Columns
Handling POs
Production Coordinator
Crew
Adding Project Users and Managing Permissions
User Permission Levels
Studios and Divisions
Creating Division Assets
Managing Events
Adding Studio Users and Managing Permissions
Customizing Fields Within Departments
Troubleshooting Guides
Webinars
All SyncOnSet Webinars
Introduction to SyncOnSet Continuity Web: Script Breakdown, Revisions, Linking and Deleting Characters
SyncOnSet Continuity Web for Costume
SyncOnSet Budgeting for Costume
Advanced SyncOnSet: Best Practices & Pro Tips
SyncOnSet for Production Coordinators
SyncOnSet Continuity for Episodic Teams: Block Shooting & Cross-boarding, Characters, Actors, and Inventory
SyncOnSet 5.0 Mobile App: Navigation, Uploading and Tagging Photos
SyncOnSet Continuity Hair & Makeup
SyncOnSet Continuity for Set Dec: Using the Mobile App
Budgeting & Money Tracking for Costumes
Budgeting & Money Tracking for Set Dec
SyncOnSet for Episodics: Season Data Transfer
SyncOnSet for Props: Introduction to Continuity & Budgeting (Web)
Transitioning to SyncOnSet 5.0 Mobile
SyncOnSet for Costumes: Adding Inventory, Changes, and Photos in Continuity Web
SyncOnSet for Students: Intro to Continuity Web
SyncOnSet Continuity Web: Production-Wide Account Basics
All AssetHub Webinars
Introduction to AssetHub 4.0: Demo
AssetHub: Managing Permissions & Adding Team Members
AssetHub: Managing Journal Entries, Returns, Merging, and Bulk Updating
Exporting Inventory from SyncOnSet to AssetHub
Webinars for Costume
Webinars for Hair and Makeup
Webinars for Props
Webinars for Set Dec
Table of Contents
- All Categories
- Continuity Web
- Gallery
- Uploading and Tagging Photos
Uploading and Tagging Photos
 Updated
by Michelle Salatto
Uploading Photos
Actors and Inventory have been added and it's time to upload and tag some photos! There are various ways you can upload photos to the website, depending on your workflow.
If you want to bulk upload your photos, we suggest uploading them from the Gallery. On the other hand, if you are looking to upload photos to a specific entity (i.e. Scene, Character, Change, etc.), we suggest uploading them from a View page. Set photos must be uploaded from the Gallery and tagged to the respective Set.
As a best practice, the total size of all photo files being uploaded should be 64MB or less. Photos are not compressed when uploaded on the web, but will display in various sizes around the site in order to reduce page load times. You can view a full size image from the Photo Viewer. Once the photo is open, right click on the image and open it in its own tab. Saving the image from there will download the full resolution image.
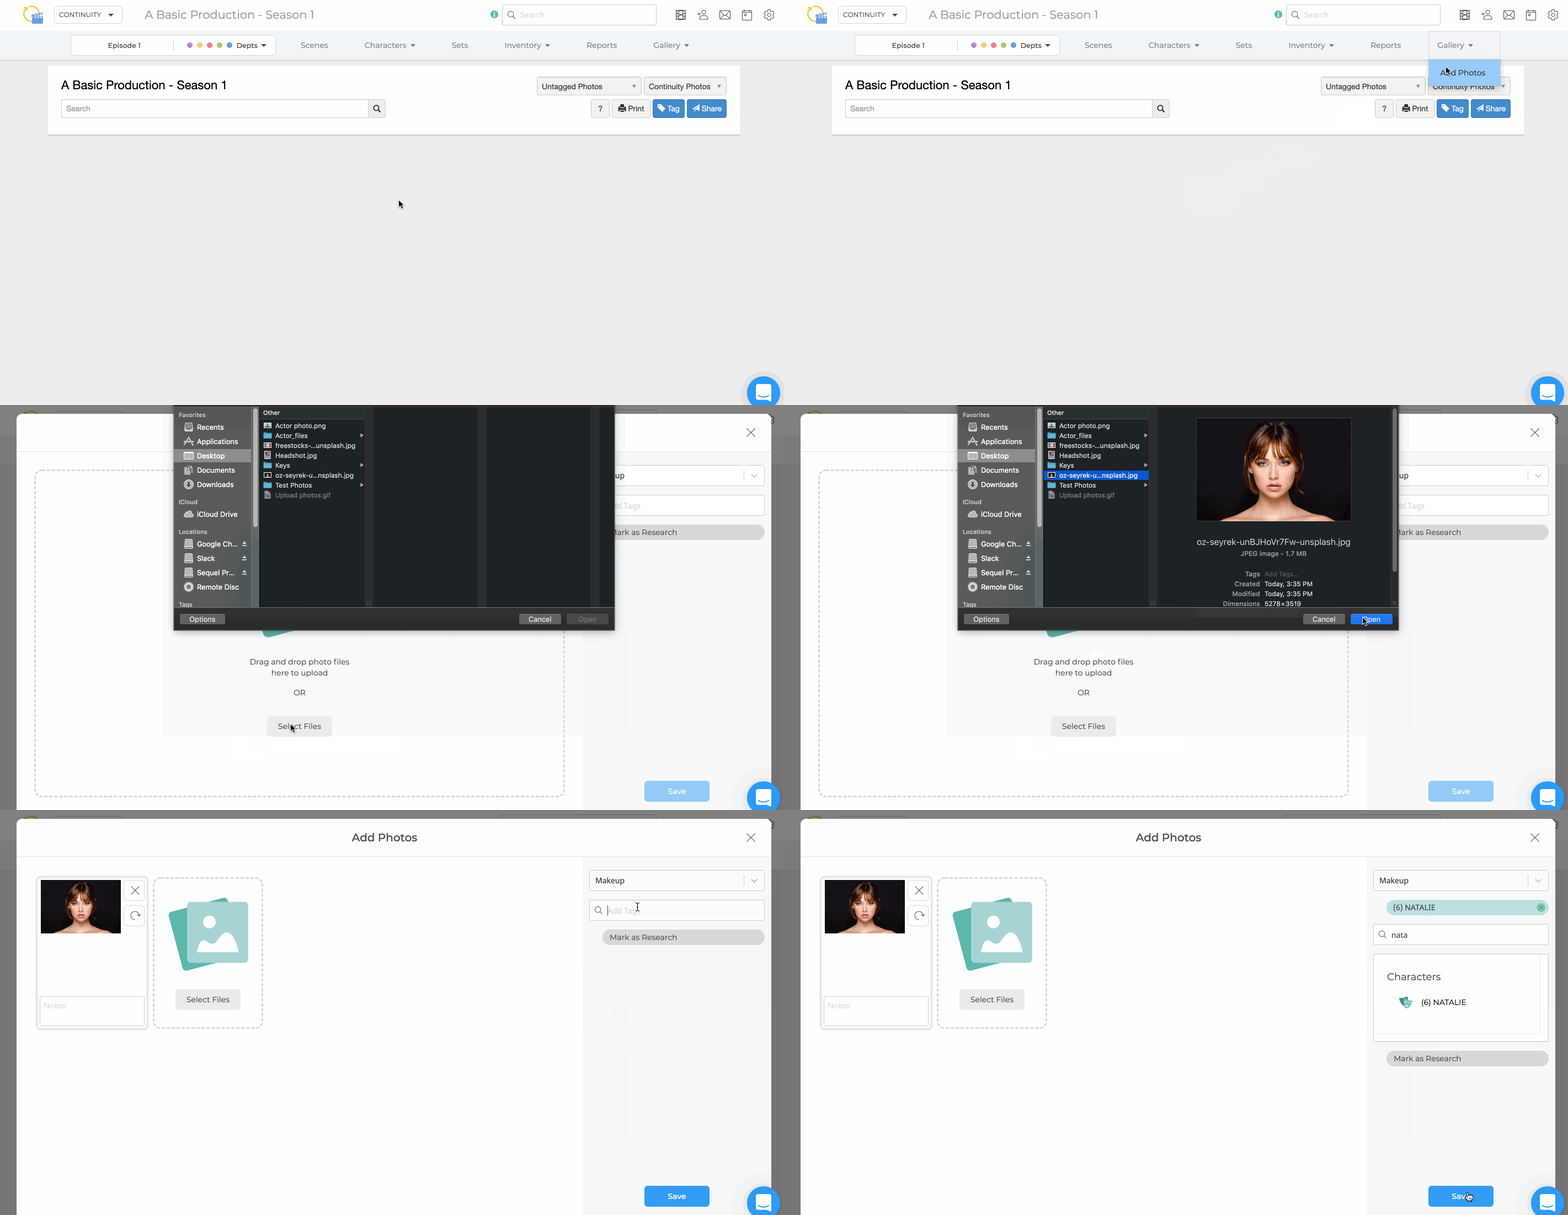
To upload photos from the Gallery:
- Hover over Gallery in the top navigation bar.
- Select Add Photos.
- Drag and drop photo files from your desktop or click Select Files to browse your desktop files to search for the photos you’d like to upload.
- If you have access to multiple departments, select the department that you’re uploading your photos under.
- Add tags to your photos by typing the name or number of any entity in your production (i.e, Scenes, Characters, Changes, Props, and/or Items). Select the appropriate tags from the search results.
- Click Save.
To upload photos from a View page:
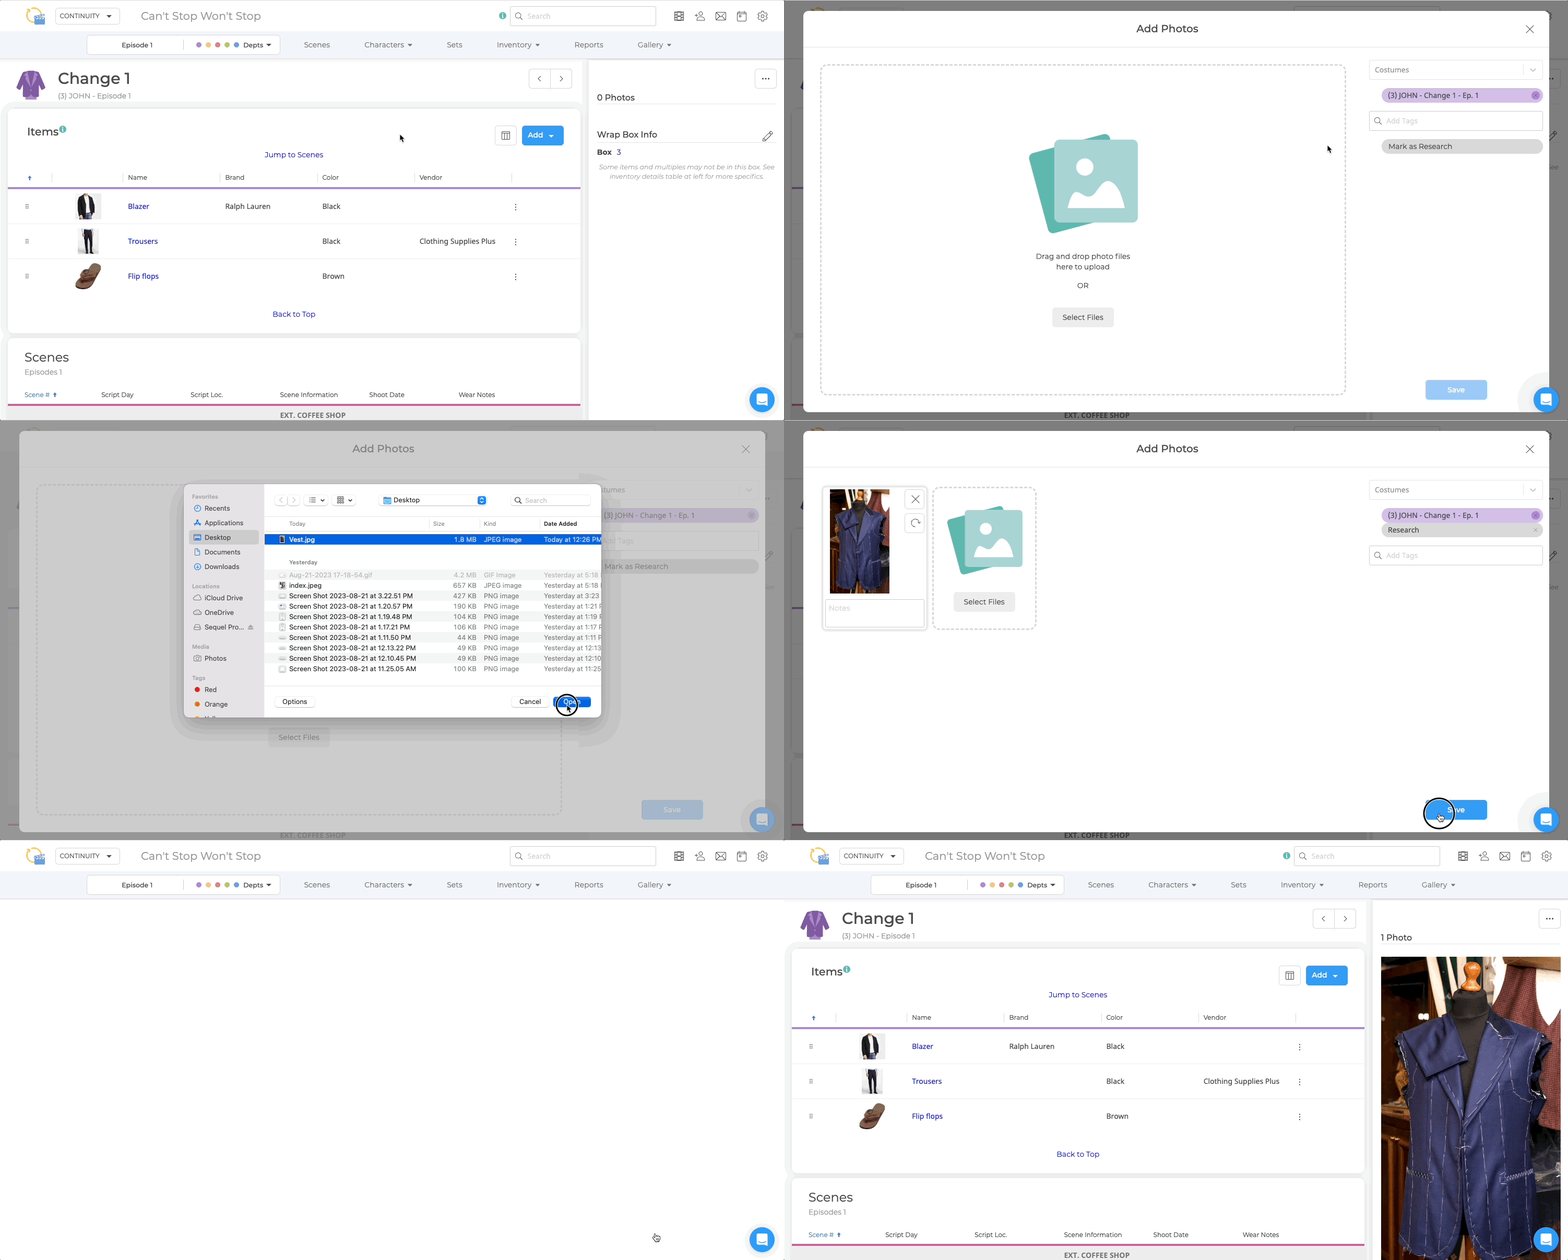
- Click on the hyperlinked name or number of a Scene, Character, Change, Look, or Prop, or use the Universal Search bar to find the entity.
- Click the Sidebar Ellipsis.
- Click Add Photo.
- You can either drag and drop photo files from your desktop or click Select Files to browse through your desktop files to search for the photos you’d like to upload.
- Click Save.

Downloading Photos
Photos are not compressed when uploaded on the web, but will display in various sizes around the site in order to reduce page load times.
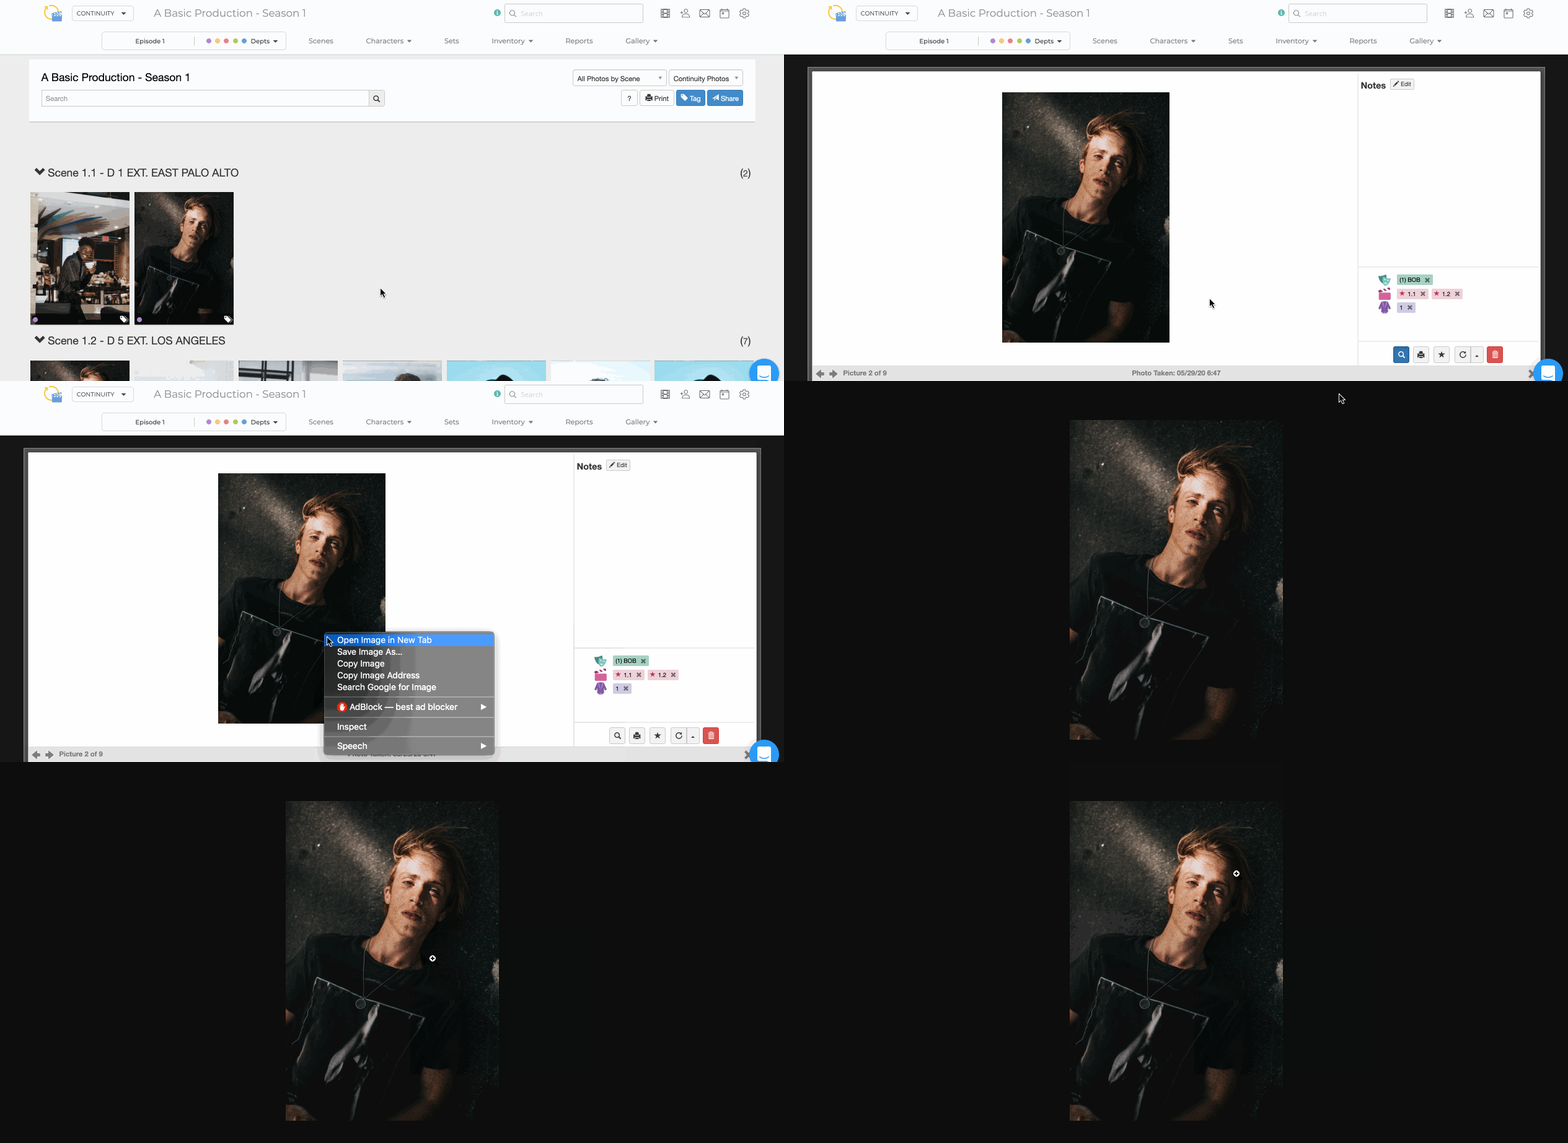
To download full-resolution photos:
- Open any photo in the Photo Viewer.
- Right click on the image and open it in its own tab. If you're in the Main Gallery, you'll need to deselect the zoom feature by clicking the Magnifying Glass Icon.
- Once the photo is open in the new tab, right click on the image to save it in full-resolution
Tagging Photos
It’s important to tag your photos in order to easily organize and locate your photos as you navigate through SyncOnSet. Photo tags tell you exactly what entities a specific photo is associated with, whether it’s a Scene, Character, Change, Look, etc. When it comes time to generate your Continuity Book, photos must be tagged correctly in order for them to appear in the right place on the report.
We recommend tagging photos when they are initially uploaded. However, if you’ve skipped this step, click into your Gallery and add the appropriate tags.
To tag photos:
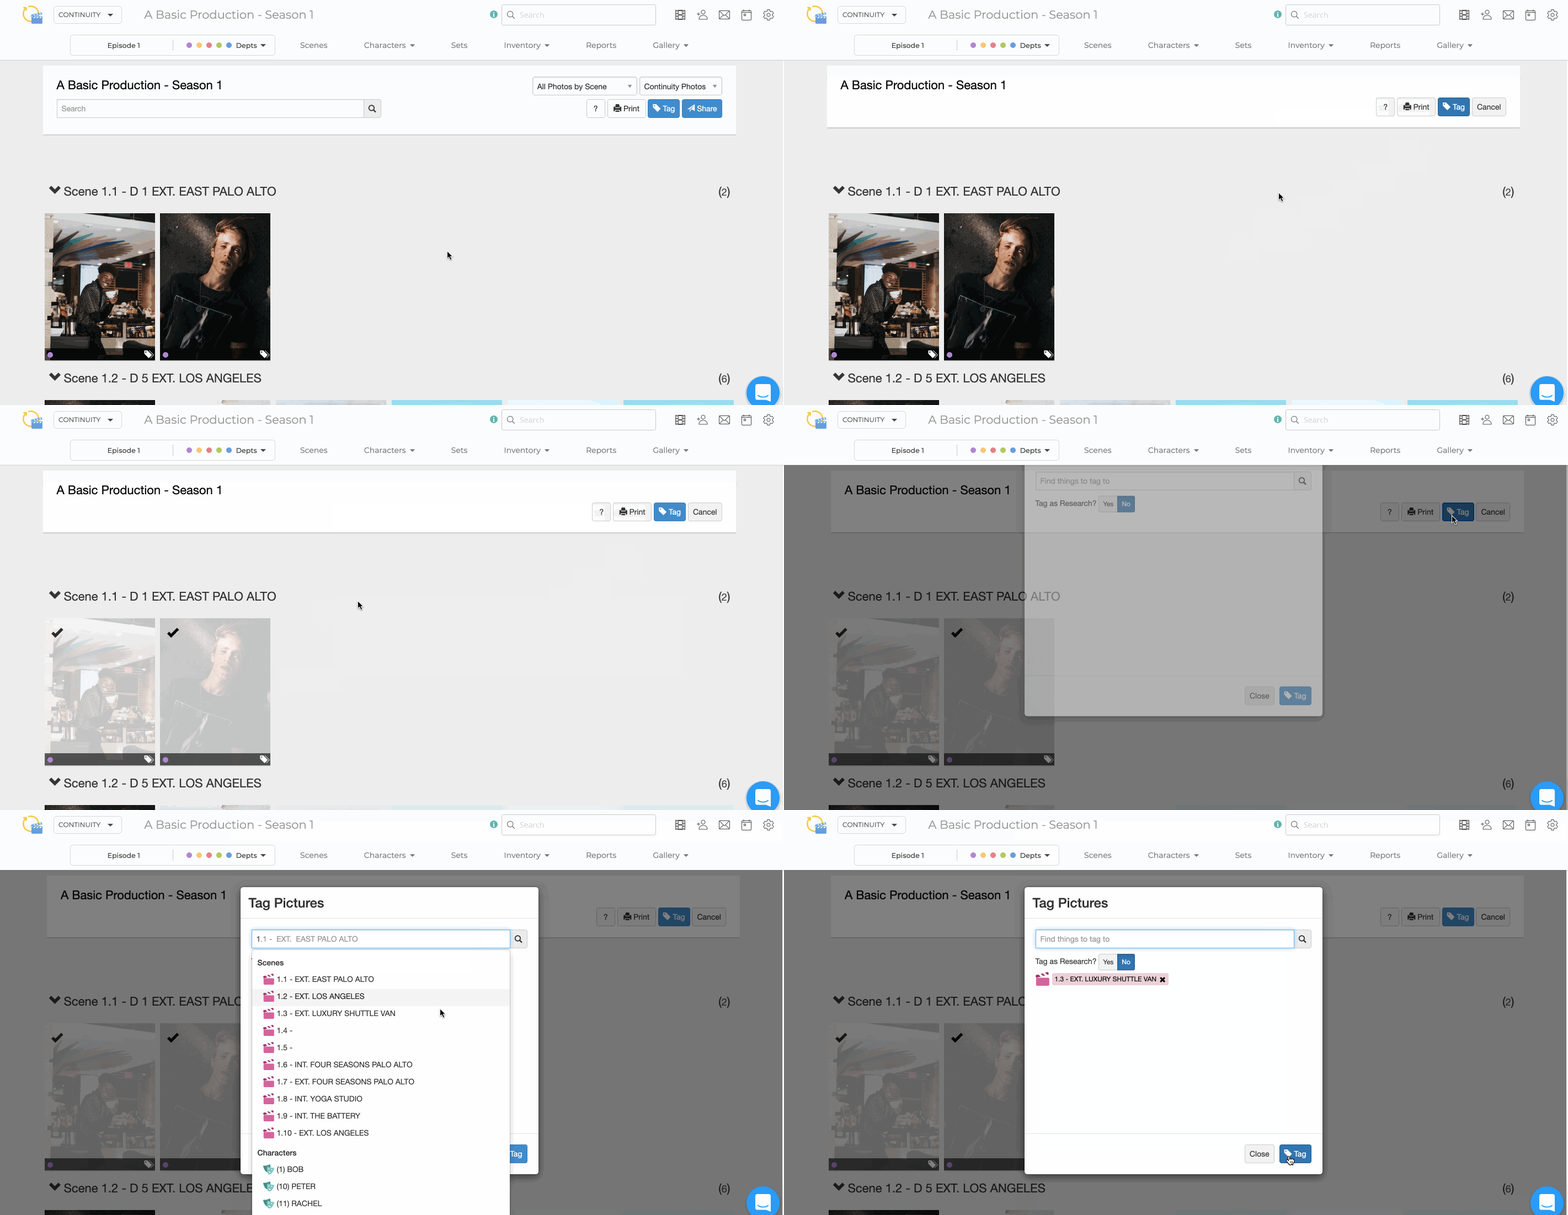
- Click Gallery in the top navigation bar.
- Locate the photos you want to tag by using the Gallery search bar or the drop-down menus in the top right corner. You can filter by Untagged Photos, All Photos by Scene, or All Photos by Character. You can also switch between Continuity Photos or Research Photos.
- Click the blue Tag button.
- Select the photo(s) you want to tag.
- Click the blue Tag button again.
- Type in the name or number of the entity you want to tag the photo(s) to. You can add as many tags as you’d like. If the photo is a research or fitting photo, use the Tag as Research toggle to mark the photos as research.
- Click Tag.
To remove tags:
- Click on the photo in the Sidebar Gallery of a View page or in the main Gallery.
- Click the X next to the tags you wish to remove.
- Click Remove to confirm.

- Related Articles: Gallery Overview, Sorting and Filtering the Gallery, Sharing Photos
Deleting Photos
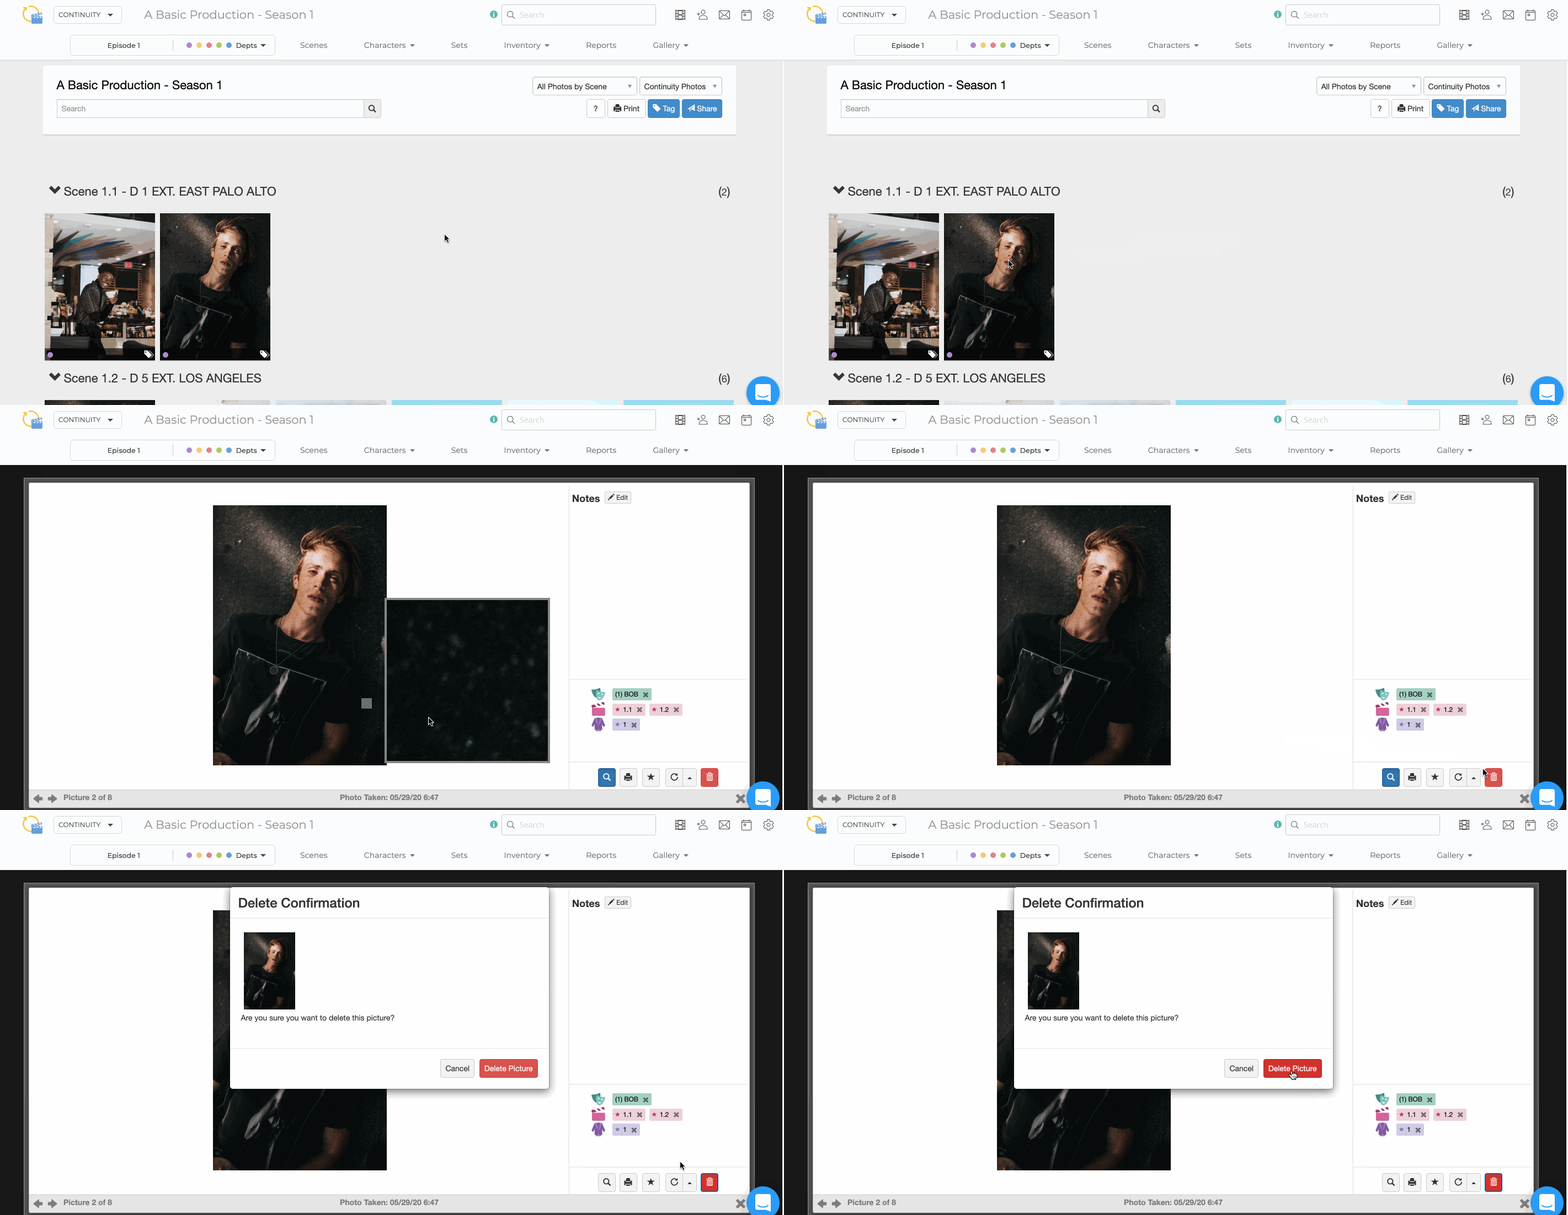
To delete photos:
- Locate the photo in the Sidebar Gallery of a View page or in the main Gallery.
- Click on it to open the Photo Viewer.
- Click the red trash can button in the bottom right corner.
- Click Delete to confirm.
Main Photo
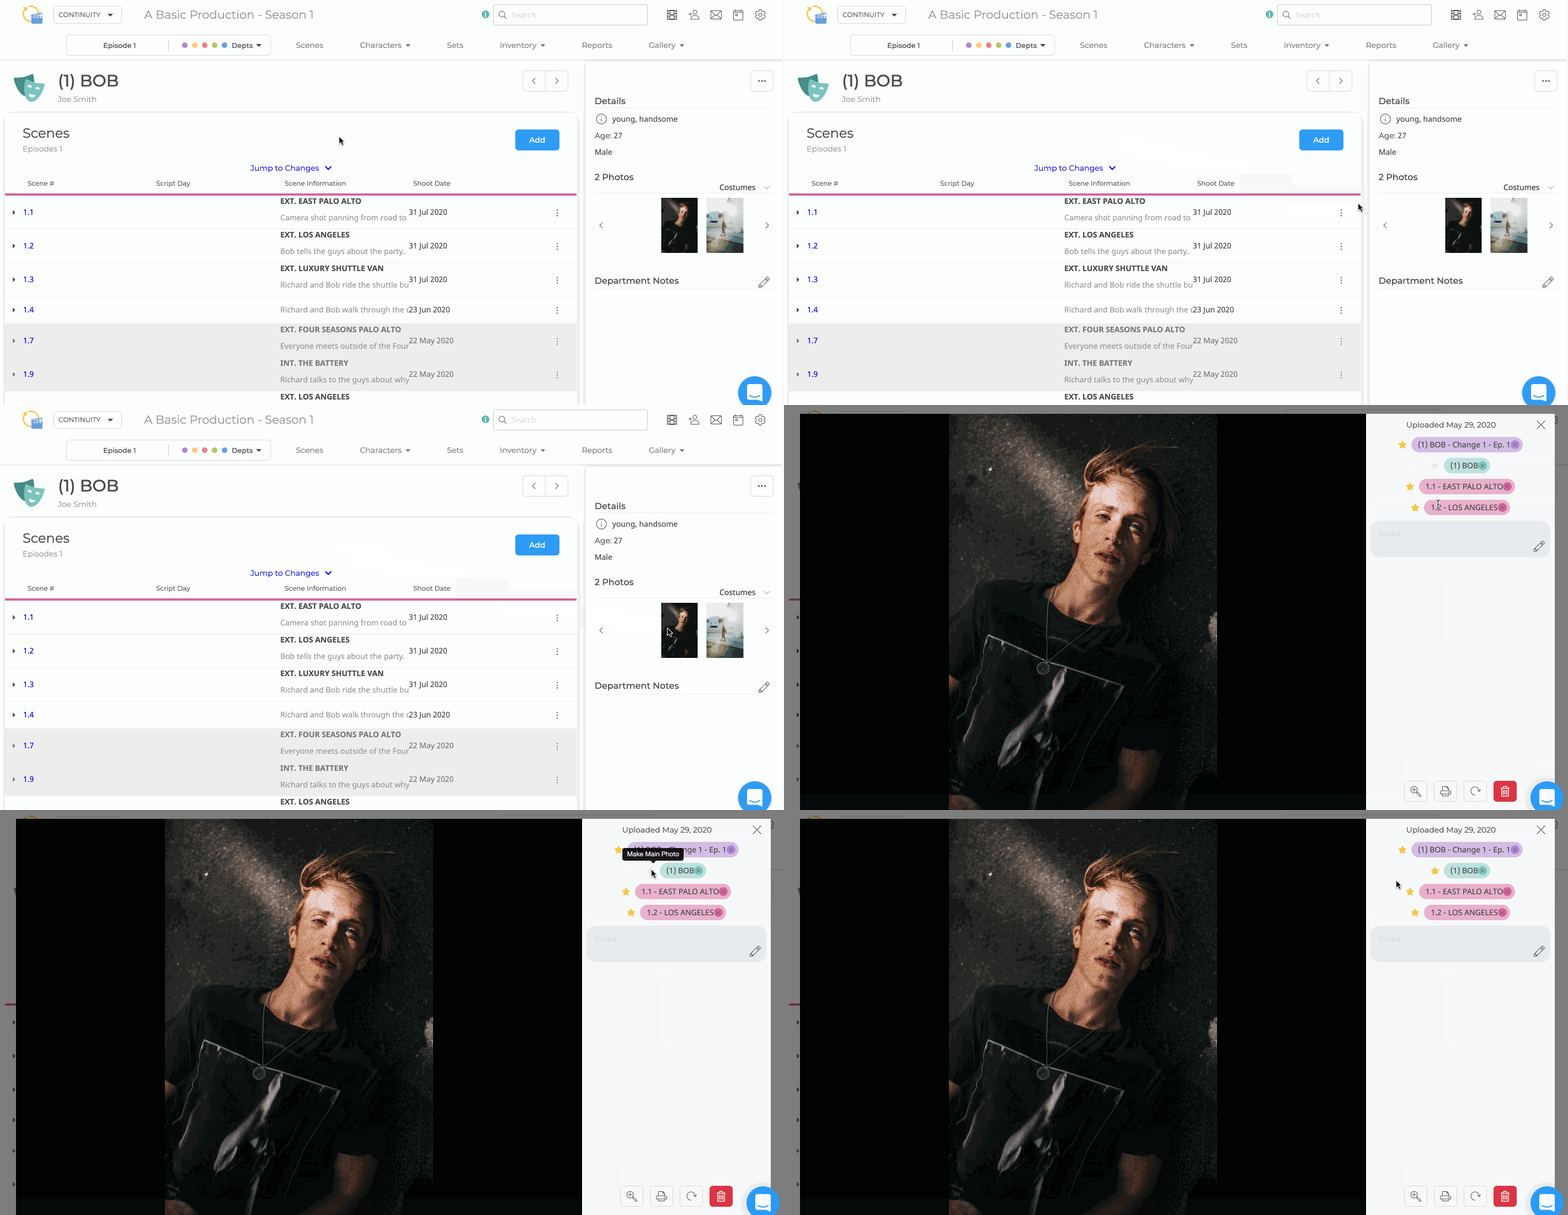
Any photo that has been tagged to a Scene, Character, Change, Look, Prop, and/or Set can be assigned as the Main Photo for that entity. The Main Photo is the photo which will appear as the thumbnail which can be used to identify that particular entity.
To make a photo the Main Photo:
- Access the View page of the entity (done by clicking on the Name/Number of the Scene, Character, Change, Look, Prop, or Set).
- Locate the photo in the Sidebar Gallery and click on it.
- Click the star icon next to the specific tag to assign it as the Main Photo for that entity.
To unassign a Main Photo from an entity, simply choose a different photo and use the steps above to assign a new photo!
Research Photos
Users with the View Research Gallery permission can upload and view any photos that have been marked as research, including fitting photos. These photos can be uploaded from a particular View page (i.e. Scene, Character, Change, etc.) as well as from the Gallery.
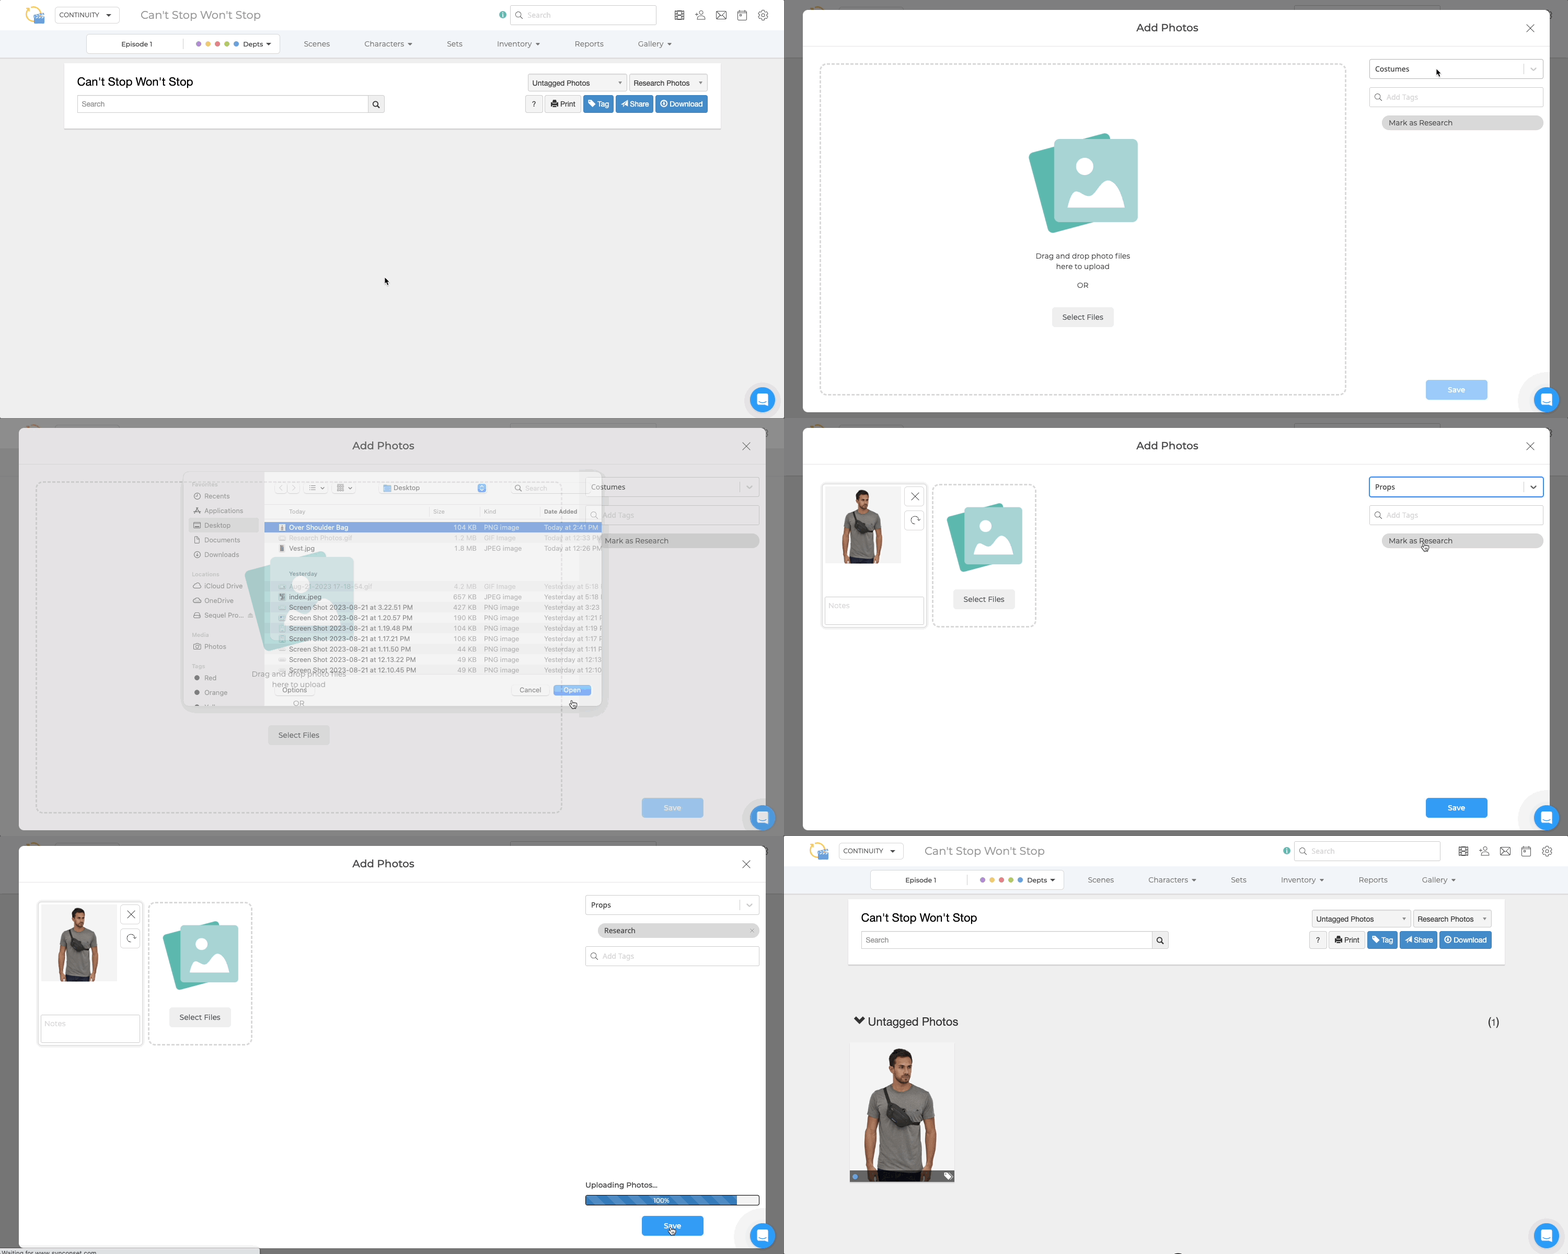
To upload research photos from the Gallery:
- Hover over Gallery in the top navigation bar.
- Select Add Photos.
- Drag and drop photo files from your desktop or click Select Files to browse your desktop files to search for the photos you’d like to upload.
- If you have access to multiple departments, select the department that you’re uploading your photos under.
- Add tags to your photos by typing the name or number of any entity in your production (i.e, Scenes, Characters, Changes, Props, and/or Items). Select the appropriate tags from the search results.
- Click Mark as Research to specify that this is a research photo.
- Click Save.
To upload research photos from a View page:
- Click the Sidebar Ellipsis and select Add Photo.
- Drag and drop your photos or select them from your computer.
- Your photos are automatically tagged to the entity of the View page that you're on. Use the search bar if you would like to add additional tags.
- Click Mark as Research to specify that this is a research photo.
- Click Save.
