Continuity Web
Getting Started
Episodics
Adding Episodes
Viewing Multiple Episodes
Episodics: Traditional vs. Like a Feature
Season Data Transfer
Logging In With Your EP Account
Register for SyncOnSet
Creating a Production and Initial Script Breakdown
Revising a Script
Accessing My Productions
Production Homepage Overview
Production Security
Managing Users and Permissions
Working on a Shared Breakdown
Multi-Department Views
Free Trials
Lite Plan for Features
Student Productions
Universal Search
Adding Notes
Managing Approvals
Calendar View
SyncOnSet Best Practices for COVID Compliance
The New and Improved SyncOnSet
Scenes
Scene Index Overview
Customizing the Scene Index
Managing Scenes
Managing Script Locations
Adding and Updating Shoot Dates
Scene View Overview
Adding Characters to a Scene
Inventory
Inventory Overview
Managing Inventory
Customizing the Inventory Index
Character Closets
Adding and Deleting Inventory
Inventory Reports
The New and Improved Inventory
Tracking Assets in Continuity
Characters and Sets
Character Index Overview
Character View Overview
Principal Characters with Multiple Numbers
Adding and Removing Background
Adding and Removing Principal Characters
Linking and Merging Characters
Deleting a Character
Set Index Overview
Set View Overview
Adding and Removing Sets
Changes and Looks
The New and Improved Changes and Looks
Changes Overview
Building a Change
Adding and Removing Changes
Editing and Inserting Changes
Bag Tags/Change Labels
Looks Overview
Building Looks for HMU
Adding and Removing Looks
Actors
Actor Index Overview
Creating Actors and Assigning Actors to Characters
Actor View Overview
The New and Improved Actors
Gallery
Gallery Overview
Uploading and Tagging Photos
Sorting and Filtering the Gallery
Printing & Sharing Photos
Wrap, Continuity Book, and Reports
Continuity Mobile
Getting Started
[Mobile] Logging In With Your EP Account
What's New in 5.5.0?
[Mobile] Home Page
[Mobile] App Settings
[Mobile] Multi-Department View
[Mobile] Syncing
[Mobile] Universal Search
[Mobile] Switching Productions and Multi-Episode View
[Mobile] Adding Notes
[Mobile] Permissions
The New and Improved Mobile App
Mobile App Overview
[Mobile] Upgrading to SyncOnSet 5.0
Scenes
Inventory
[Mobile] Inventory Overview
[Mobile] Character Closets
[Mobile] The New and Improved Inventory
[Mobile] Managing Inventory
[Mobile] Adding and Removing Inventory
Characters + Sets
[Mobile] Character Index Overview
[Mobile] Character View Overview
[Mobile] Viewing Characters by Scene
[Mobile] Sets Overview
[Mobile] Viewing Sets by Scene
Changes & Looks
[Mobile] Adding and Removing Changes
[Mobile] Building A Change
[Mobile] Printing Bag Tags
[Mobile] Adding and Removing Looks
[Mobile] Building Looks for HMU
The New and Improved Changes and Looks for Mobile
Wrap
Actors
Photos
Budgeting and Money Tracking
Budgeting
Budget Overview
Creating an Amort Episode
Budgeting for Costume
Budgeting for Miscellaneous
Budgeting for Props
Budgeting for Set Dec
Budget and Money Tracking Best Practices
Budget Reports
Money Tracking
FAQs
Troubleshooting Guides
Cannot Edit Production
Scenes/Characters Missing After Breakdown
Unable to Sync
Missing Photos
Miscellaneous Groups Don’t Match
Bag Tag Printing Skips Labels
Reports Skipping Pages
Editing the Name of a Script Revision
Web Browser is Slow
Product Updates
AssetHub
Getting Started
Managing Assets
Creating Assets
Creating Assets by Exporting Inventory from SyncOnSet
Creating Assets Manually
Creating Assets with Asset Import
Reconciling Single Transactions as Assets
Reconciling Journal Entries
Handling Returns
Bulk Reconciling Transactions
Bulk Updating
Excluding Transactions
Splitting Transactions
Splitting/Duplicating Assets
Merging Assets
Adding Photos to an Asset
Uploading Documents to an Asset
Choosing the Correct Disposition
Creating Storage Locations and Sub Locations
Additional Features
Running Reports (Asset Pages, CSV, PDF, Asset Disposition Report)
Searching and Filtering Assets
Creating, Editing, and Deleting Characters and Sets
Moving Assets Within AssetHub
Managing Groups
Trashing Assets
Requests and Approvals
Accessing AssetHub on a Mobile Device
Using Barcodes with Assets
AssetHub Best Practices for COVID Compliance
Features and Series
Accounting
Accounting Onboarding
Locking Currencies
Exporting Asset Reports from SmartAccounting
Exporting Asset Reports from Global Vista
Exporting Asset Reports from PSL
Uploading Ledgers
Matching Columns
Handling POs
Production Coordinator
Crew
Adding Project Users and Managing Permissions
User Permission Levels
Studios and Divisions
Creating Division Assets
Managing Events
Adding Studio Users and Managing Permissions
Customizing Fields Within Departments
Troubleshooting Guides
Webinars
All SyncOnSet Webinars
Introduction to SyncOnSet Continuity Web: Script Breakdown, Revisions, Linking and Deleting Characters
SyncOnSet Continuity Web for Costume
SyncOnSet Budgeting for Costume
Advanced SyncOnSet: Best Practices & Pro Tips
SyncOnSet for Production Coordinators
SyncOnSet Continuity for Episodic Teams: Block Shooting & Cross-boarding, Characters, Actors, and Inventory
SyncOnSet 5.0 Mobile App: Navigation, Uploading and Tagging Photos
SyncOnSet Continuity Hair & Makeup
SyncOnSet Continuity for Set Dec: Using the Mobile App
Budgeting & Money Tracking for Costumes
Budgeting & Money Tracking for Set Dec
SyncOnSet for Episodics: Season Data Transfer
SyncOnSet for Props: Introduction to Continuity & Budgeting (Web)
Transitioning to SyncOnSet 5.0 Mobile
SyncOnSet for Costumes: Adding Inventory, Changes, and Photos in Continuity Web
SyncOnSet for Students: Intro to Continuity Web
SyncOnSet Continuity Web: Production-Wide Account Basics
All AssetHub Webinars
Introduction to AssetHub 4.0: Demo
AssetHub: Managing Permissions & Adding Team Members
AssetHub: Managing Journal Entries, Returns, Merging, and Bulk Updating
Exporting Inventory from SyncOnSet to AssetHub
Webinars for Costume
Webinars for Hair and Makeup
Webinars for Props
Webinars for Set Dec
Table of Contents
- All Categories
- Continuity Mobile
- Photos
- [Mobile] Photo Markup and Editing Photos
[Mobile] Photo Markup and Editing Photos
Updated
by Christine Sanchez
The Photo Editing tool allows you to edit, overlay text, and markup your photos on the fly. This feature can be accessed on any page where photos can be uploaded.
Photo Markup on iOS
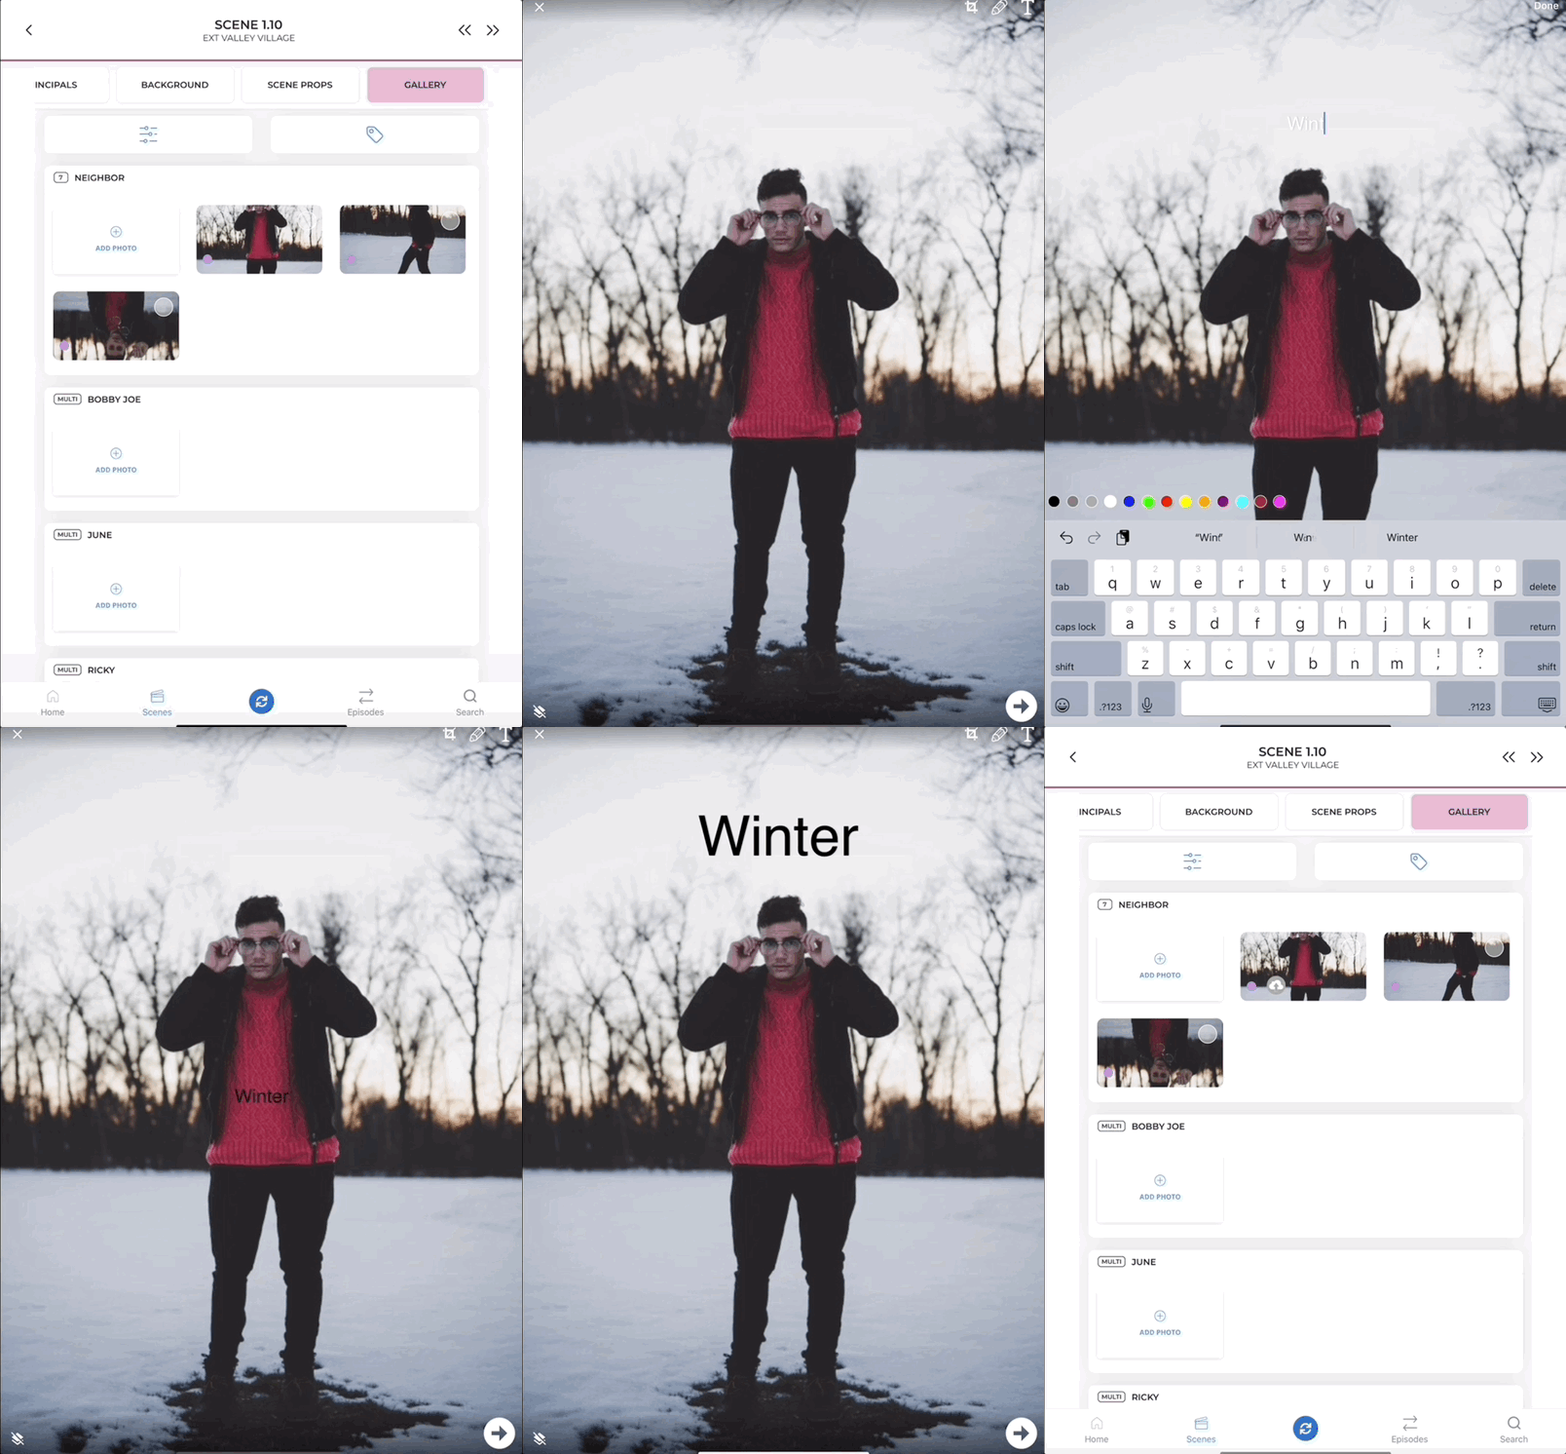
Adding Text
The Text Icon in the Photo Editor allows you to overlay text on top of your photos. You can add multiple text boxes to add detail to multiple areas of the photo.
- Tap Gallery in the top navigation bar of any Scene, Character, Set, Change, or Look View page, or tap into the Inventory View page of any Item.
- Tap the photo you want to edit.
- Tap the Pencil Icon.
- Tap the Text Icon (indicated by a T).
- Select a color and begin typing to add text.
- Tap Done to dismiss the keyboard and the text can be moved, resized, and rotated.
- To move text, tap and hold on the text with one finger, then drag to the desired location.
- To resize and rotate text, tap and hold on the text with two fingers, then pinch to enlarge/shrink the text, or rotate your fingers to rotate the text.
- Text can be deleted by dragging the text to the Trashcan Icon at the bottom of the page.
- Tap the Next Arrow at the bottom right of the page to confirm your edits.
Drawing
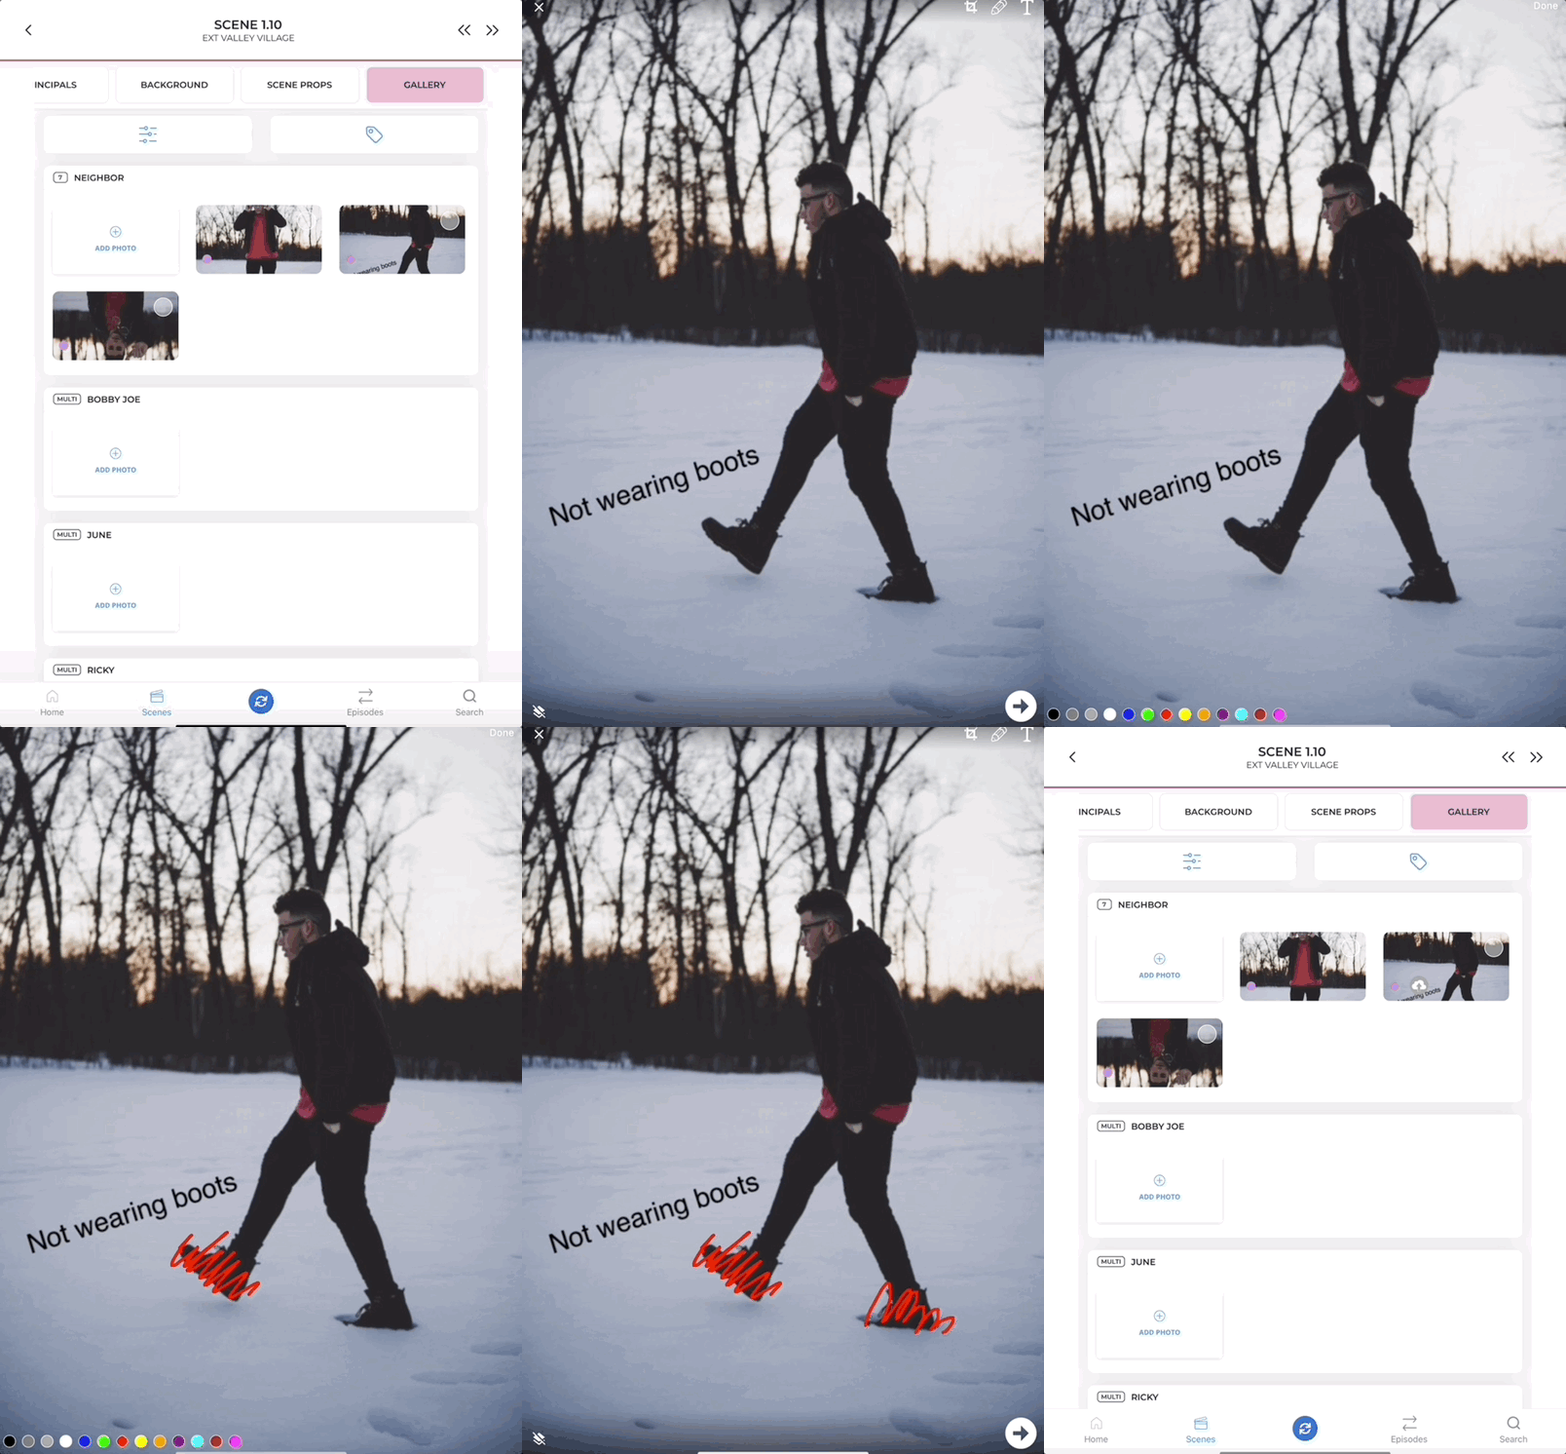
The Pencil Icon in the Photo Editor allows you to draw freely over your photos, allowing you to highlight or modify specific details in the photo.
- Tap Gallery in the top navigation bar of any Scene, Character, Set, Change, or Look View page, or tap into the Inventory View page of any Item.
- Tap the photo you want to edit.
- Tap the Pencil Icon.
- Tap the Pencil Icon again.
- Select a desired color.
- Tap, hold and drag your finger across the photo to draw.
- Tap Done when finished.
- Tap the Next Arrow at the bottom right of the page to confirm your edits.
Crop, Zoom, and Rotate on iOS
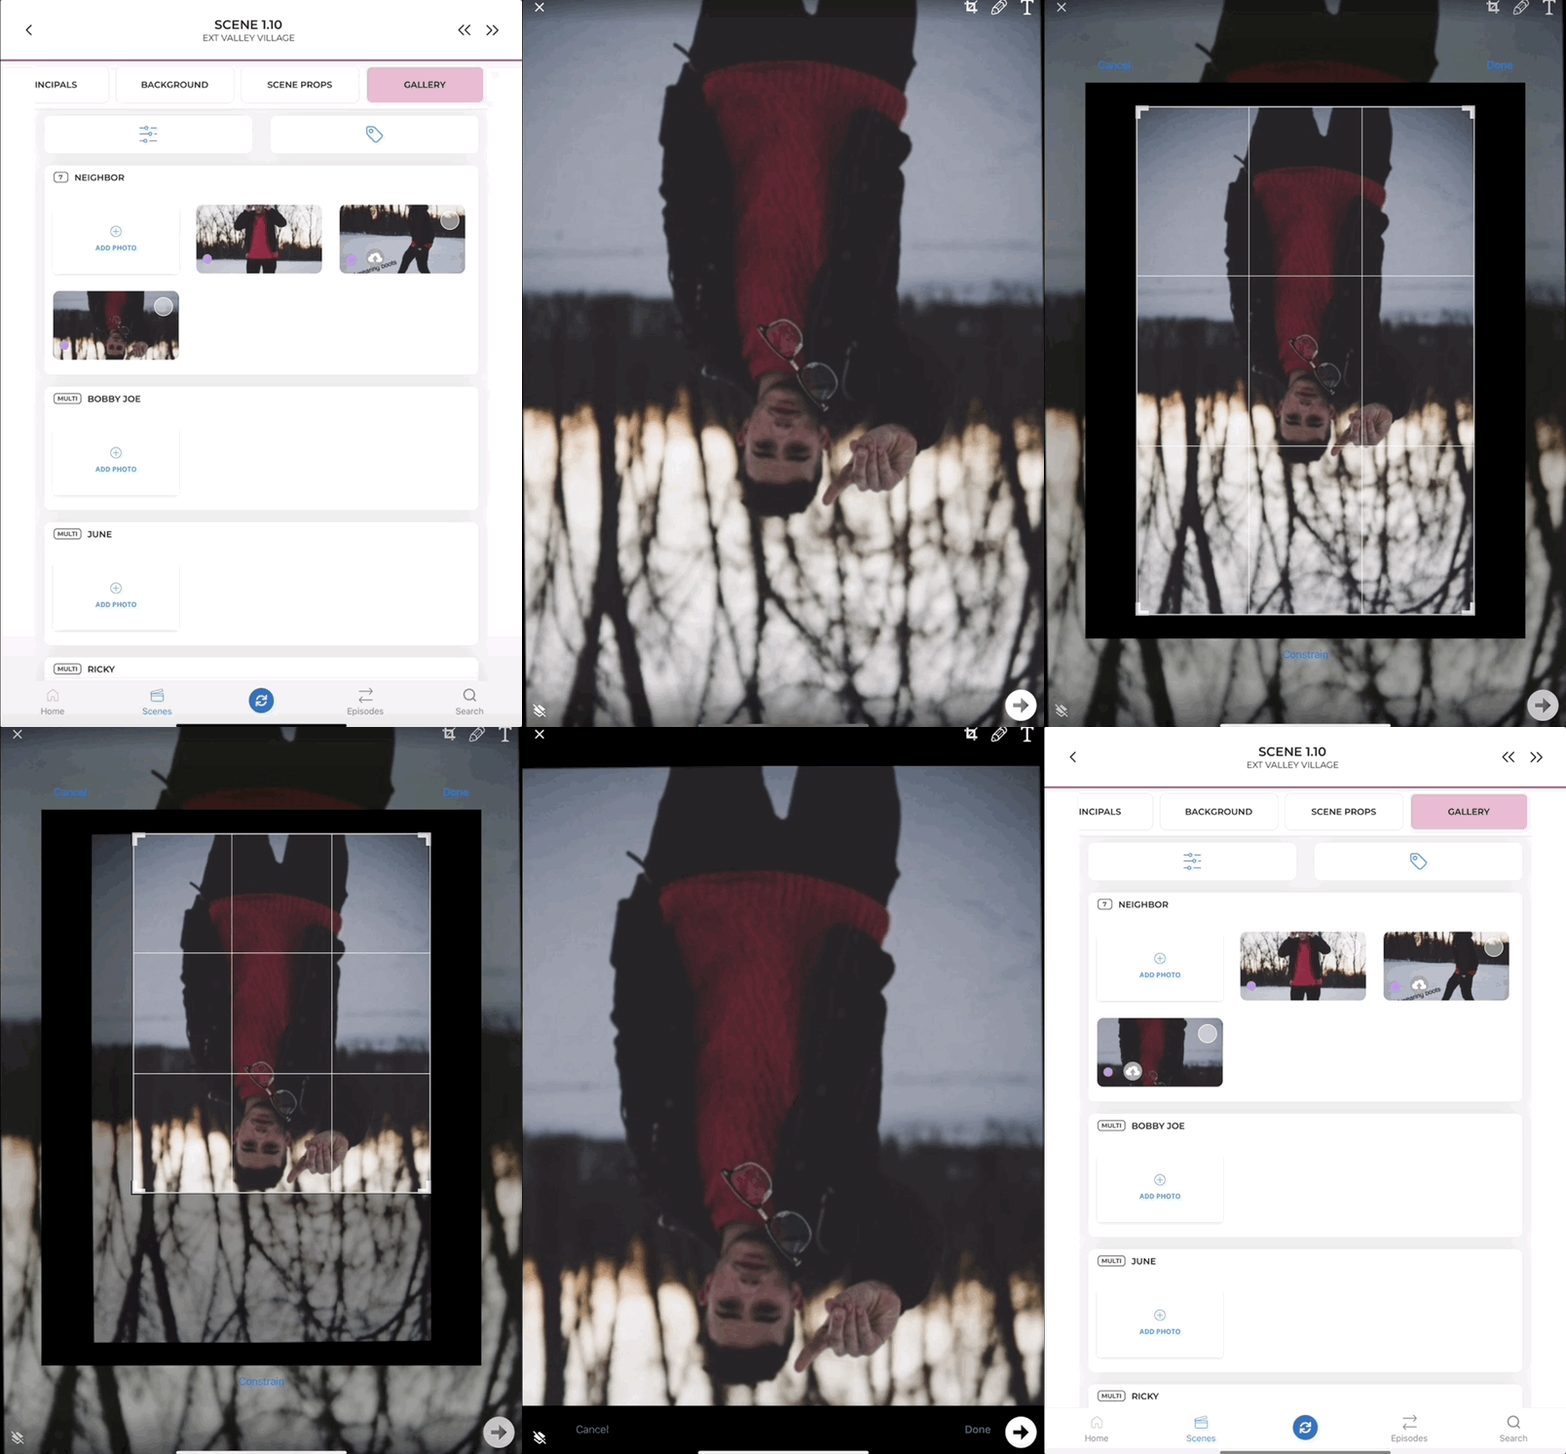
Crop
- Tap Gallery in the top navigation bar of any Scene, Character, Set, Change, or Look View page, or tap into the Inventory View page of any Item.
- Tap the photo you want to edit.
- Tap the Pencil Icon.
- Tap the Crop Icon to open the cropping window.
- Drag the edges or corners of the cropping window to select the desired crop area.
- To crop to a specific aspect ratio, tap Constrain, then select the desired aspect ratio from the list.
- Tap Done to crop the image.
- Tap the Next Arrow at the bottom right of the page to confirm your edits.
Zoom
- Tap Gallery in the top navigation bar of any Scene, Character, Set, Change, or Look View page, or tap into the Inventory View page of any Item.
- Tap the photo you want to edit.
- Tap the Pencil Icon.
- Tap the Crop Icon to open the cropping window.
- Tap and hold on the photo with two fingers, then pinch to zoom in or out.
- Tap Done.
- Tap the Next Arrow at the bottom right of the page to confirm your edits.
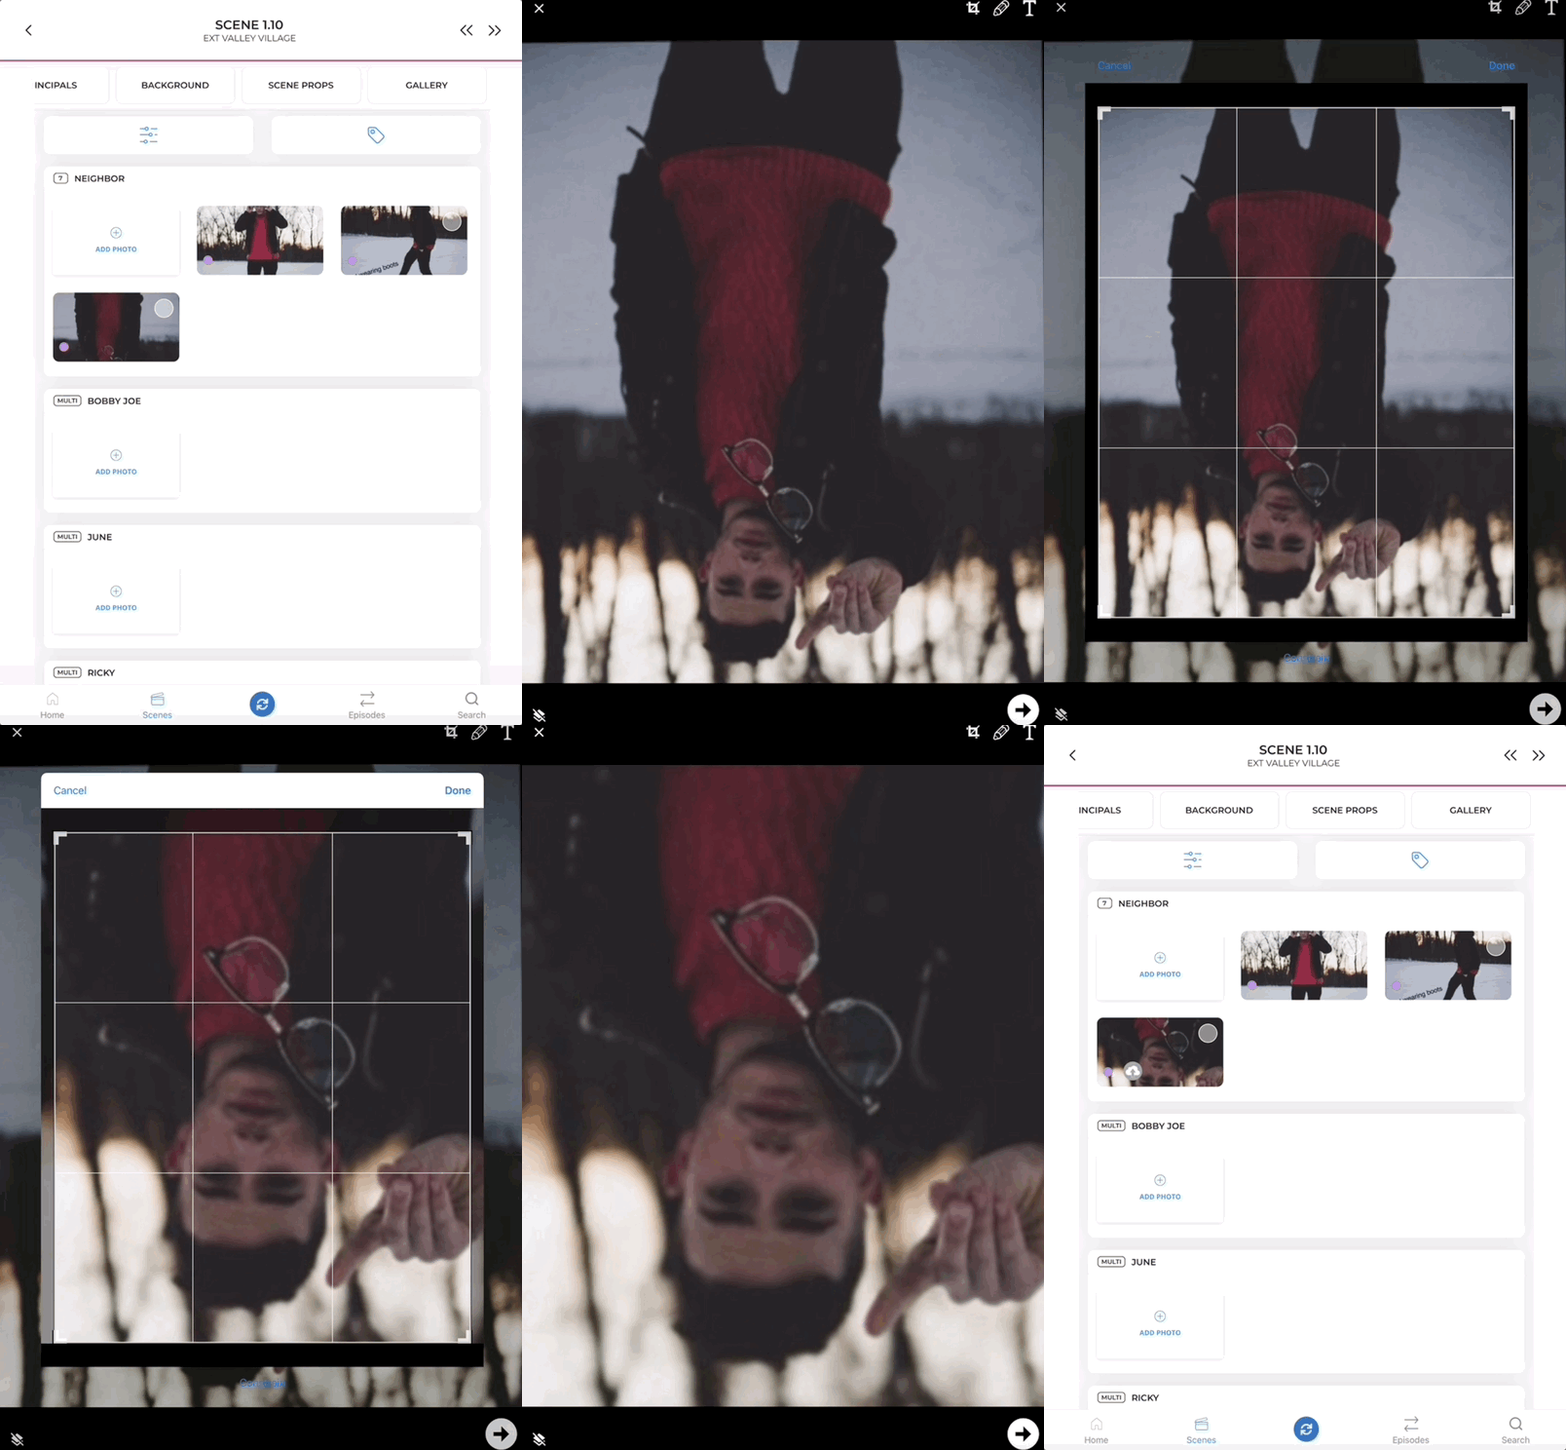
Rotate
- Tap Gallery in the top navigation bar of any Scene, Character, Set, Change, or Look View page, or tap into the Inventory View page of any Item.
- Tap the photo you want to edit.
- Tap the Pencil Icon.
- Tap the Crop Icon to open the cropping window.
- Tap and hold on the photo with two fingers, then rotate your fingers to rotate the photo.
- Tap Done.
- Tap the Next Arrow at the bottom right of the page to confirm your edits.

Photo Markup on Android
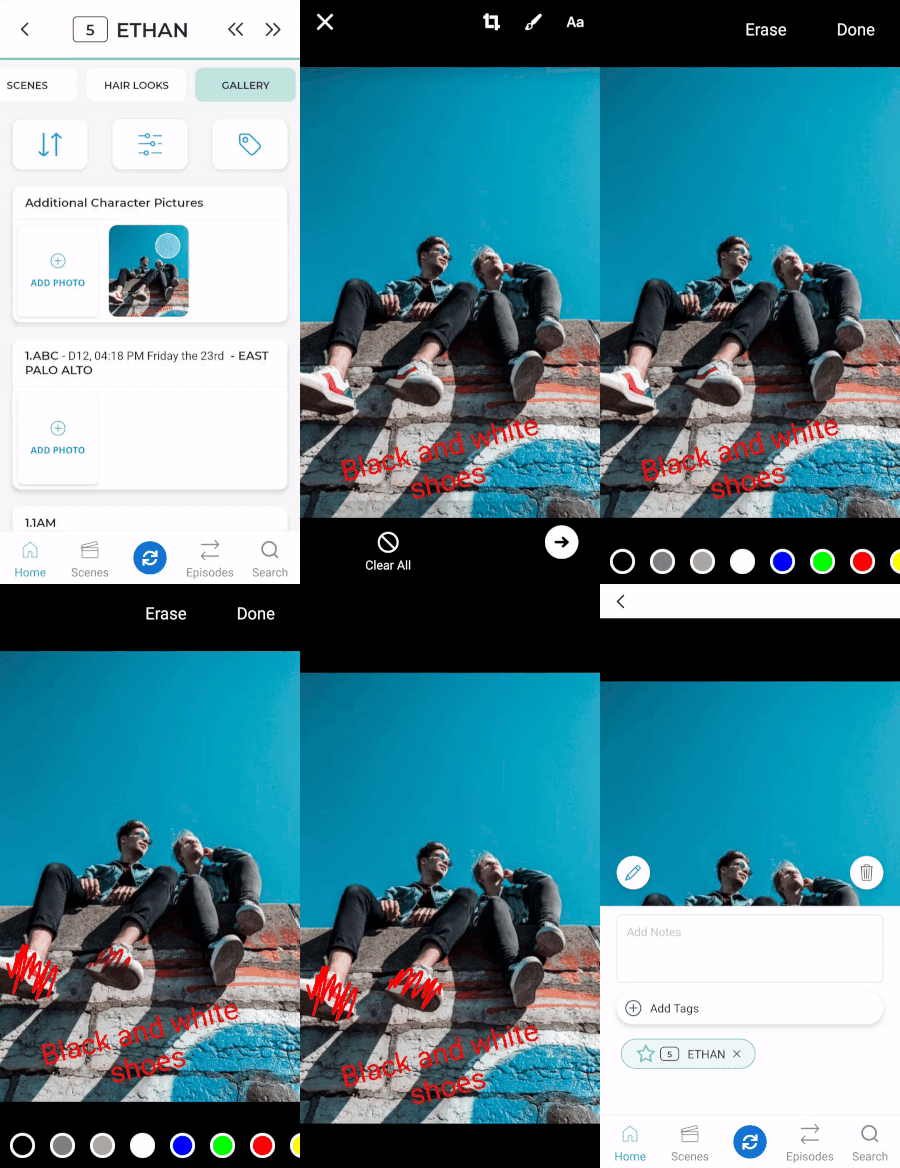
Adding Text
The Text Icon in the Photo Editor allows you to overlay text on top of your photos. You can add multiple text boxes to add detail to multiple areas of the photo.
- Tap Gallery in the top navigation bar of any Scene, Character, Set, Change, or Look View page, or tap into the Inventory View page of any Item.
- Tap the photo you want to edit.
- Tap the Pencil Icon.
- Tap the Text Icon (indicated by a Aa).
- Select a color, tap the photo, and begin typing to add text.
- Tap Done to dismiss the keyboard and the text can be moved, resized, and rotated.
- To move text, tap and hold on the text with one finger, then drag to the desired location.
- To resize and rotate text, tap and hold on the text with two fingers, then pinch to enlarge/shrink the text, or rotate your fingers to rotate the text.
- Text can be deleted by dragging the text to the Trashcan Icon at the bottom of the page.
- Tap the Next Arrow at the bottom right of the page to confirm your edits.

Drawing
The Paintbrush Icon in the Photo Editor allows you to draw freely over your photos, allowing you to highlight or modify specific details in the photo.
- Tap Gallery in the top navigation bar of any Scene, Character, Set, Change, or Look View page, or tap into the Inventory View page of any Item.
- Tap the photo you want to edit.
- Tap the Pencil Icon.
- Tap the Paintbrush Icon.
- Select a desired color.
- Tap, hold and drag your finger across the photo to draw.
- To erase, tap Erase, then tap, hold and drag your finger across the area you'd like to remove.
- Tap Done when finished.
- Tap the Next Arrow at the bottom right of the page to confirm your edits.
Crop, Zoom, and Rotate on Android
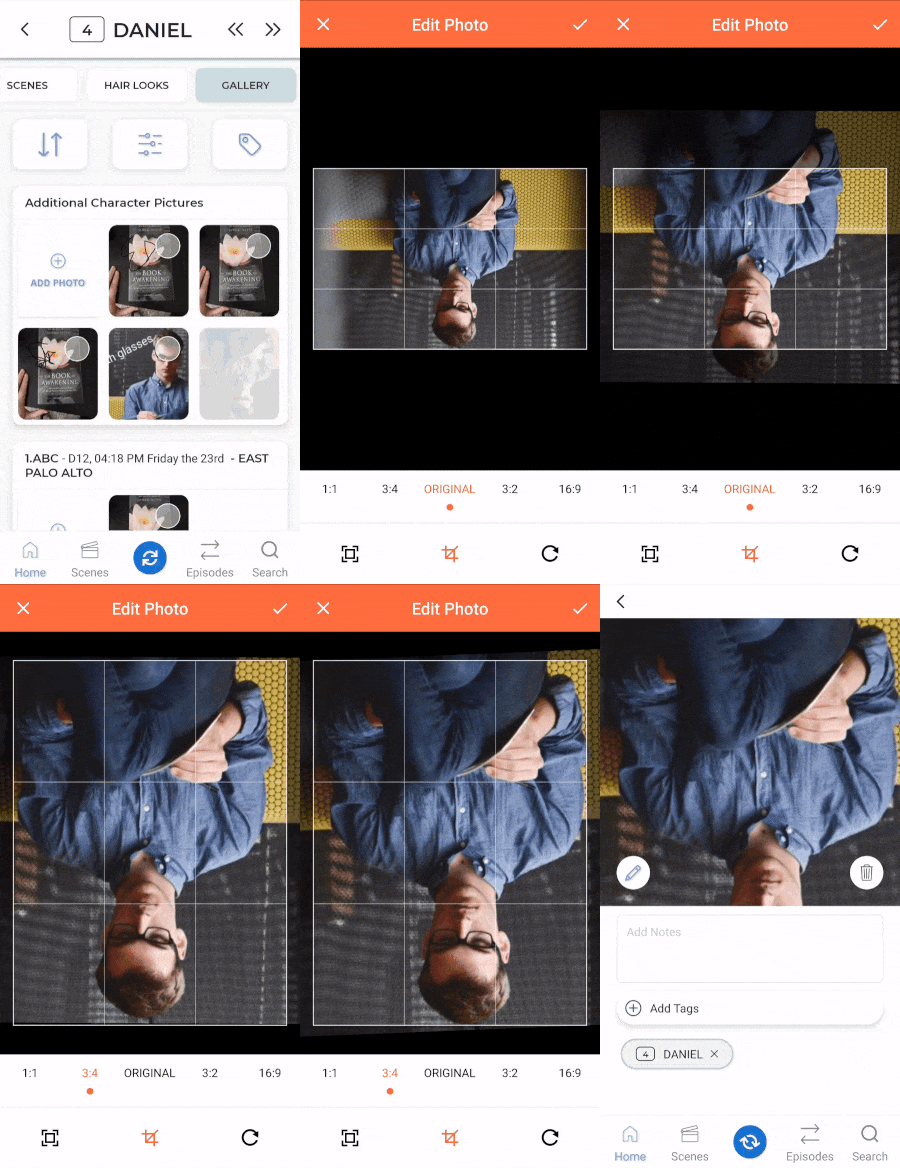
Crop
- Tap Gallery in the top navigation bar of any Scene, Character, Set, Change, or Look View page, or tap into the Inventory View page of any Item.
- Tap the photo you want to edit.
- Tap the Pencil Icon.
- Tap the Crop Icon to open the cropping window.
- Drag the edges or corners of the cropping window to select the desired crop area.
- To crop to a specific aspect ratio, select the desired aspect ratio from the list.
- Tap the Checkmark to crop the image.
- Tap the Next Arrow at the bottom right of the page to confirm your edits.
Zoom
- Tap Gallery in the top navigation bar of any Scene, Character, Set, Change, or Look View page, or tap into the Inventory View page of any Item.
- Tap the photo you want to edit.
- Tap the Pencil Icon.
- Tap the Crop Icon to open the cropping window.
- Tap and hold on the photo with two fingers, then pinch to zoom in or out.
- Tap the Zoom Icon, then tap and drag the slider bar to the desired zoom percent.
- Tap the Checkmark.
- Tap the Next Arrow at the bottom right of the page to confirm your edits.
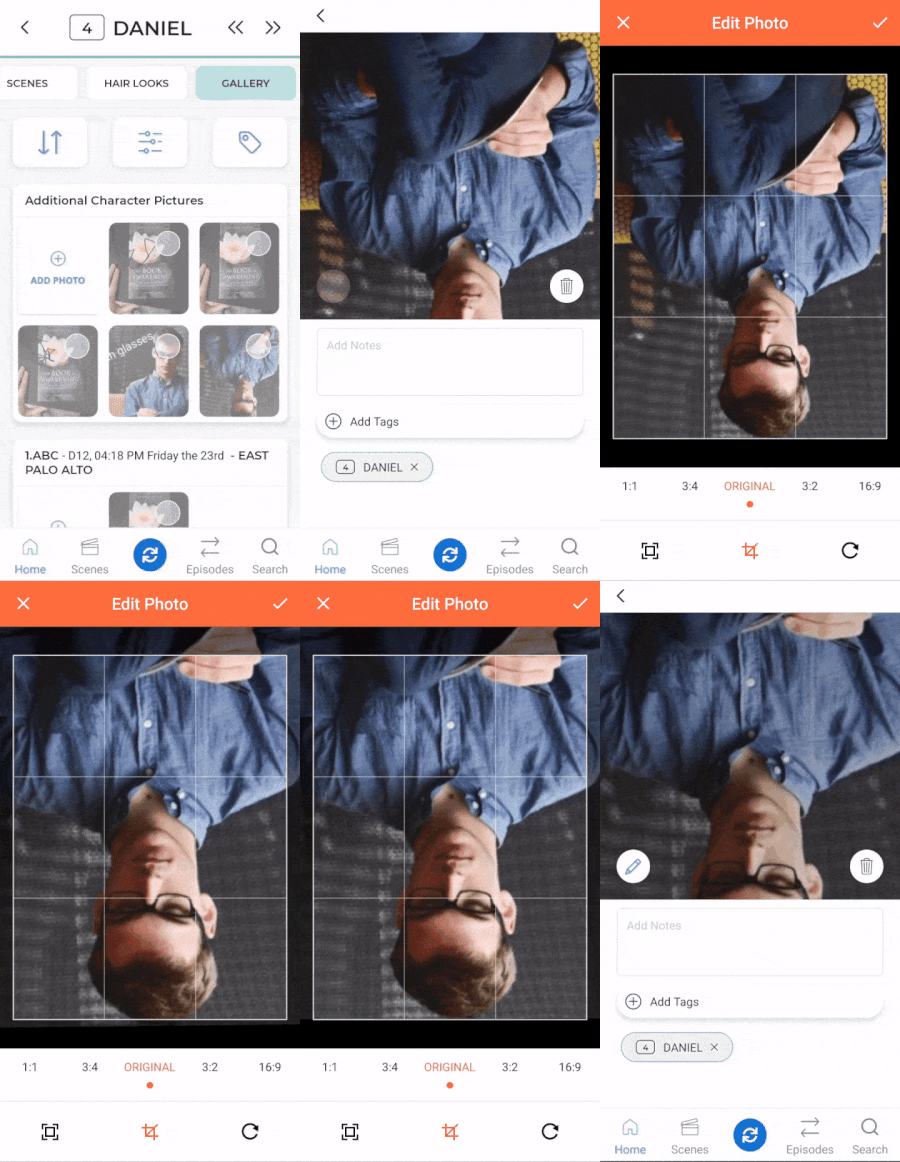
Rotate
- Tap Gallery in the top navigation bar of any Scene, Character, Set, Change, or Look View page, or tap into the Inventory View page of any Item.
- Tap the photo you want to edit.
- Tap the Pencil Icon.
- Tap the Crop Icon to open the cropping window.
- Tap and hold on the photo with two fingers, then rotate your fingers to rotate the photo.
- Tap the Rotate Icon, then tap and drag the slider bar to the desired degree.
- Tap the 90° Icon to rotate in 90° increments.
- Tap the Checkmark.
- Tap the Next Arrow at the bottom right of the page to confirm your edits.
