Continuity Web
Getting Started
Episodics
Adding Episodes
Viewing Multiple Episodes
Episodics: Traditional vs. Like a Feature
Season Data Transfer
Logging In With Your EP Account
Register for SyncOnSet
Creating a Production and Initial Script Breakdown
Revising a Script
Accessing My Productions
Production Homepage Overview
Production Security
Managing Users and Permissions
Working on a Shared Breakdown
Multi-Department Views
Free Trials
Lite Plan for Features
Student Productions
Universal Search
Adding Notes
Managing Approvals
Calendar View
SyncOnSet Best Practices for COVID Compliance
The New and Improved SyncOnSet
Scenes
Scene Index Overview
Customizing the Scene Index
Managing Scenes
Managing Script Locations
Adding and Updating Shoot Dates
Scene View Overview
Adding Characters to a Scene
Inventory
Inventory Overview
Managing Inventory
Customizing the Inventory Index
Character Closets
Adding and Deleting Inventory
Inventory Reports
The New and Improved Inventory
Tracking Assets in Continuity
Characters and Sets
Character Index Overview
Character View Overview
Principal Characters with Multiple Numbers
Adding and Removing Background
Adding and Removing Principal Characters
Linking and Merging Characters
Deleting a Character
Set Index Overview
Set View Overview
Adding and Removing Sets
Changes and Looks
The New and Improved Changes and Looks
Changes Overview
Building a Change
Adding and Removing Changes
Editing and Inserting Changes
Bag Tags/Change Labels
Looks Overview
Building Looks for HMU
Adding and Removing Looks
Actors
Actor Index Overview
Creating Actors and Assigning Actors to Characters
Actor View Overview
The New and Improved Actors
Gallery
Gallery Overview
Uploading and Tagging Photos
Sorting and Filtering the Gallery
Printing & Sharing Photos
Wrap, Continuity Book, and Reports
Continuity Mobile
Getting Started
[Mobile] Logging In With Your EP Account
What's New in 5.5.0?
[Mobile] Home Page
[Mobile] App Settings
[Mobile] Multi-Department View
[Mobile] Syncing
[Mobile] Universal Search
[Mobile] Switching Productions and Multi-Episode View
[Mobile] Adding Notes
[Mobile] Permissions
The New and Improved Mobile App
Mobile App Overview
[Mobile] Upgrading to SyncOnSet 5.0
Scenes
Inventory
[Mobile] Inventory Overview
[Mobile] Character Closets
[Mobile] The New and Improved Inventory
[Mobile] Managing Inventory
[Mobile] Adding and Removing Inventory
Characters + Sets
[Mobile] Character Index Overview
[Mobile] Character View Overview
[Mobile] Viewing Characters by Scene
[Mobile] Sets Overview
[Mobile] Viewing Sets by Scene
Changes & Looks
[Mobile] Adding and Removing Changes
[Mobile] Building A Change
[Mobile] Printing Bag Tags
[Mobile] Adding and Removing Looks
[Mobile] Building Looks for HMU
The New and Improved Changes and Looks for Mobile
Wrap
Actors
Photos
Budgeting and Money Tracking
Budgeting
Budget Overview
Creating an Amort Episode
Budgeting for Costume
Budgeting for Miscellaneous
Budgeting for Props
Budgeting for Set Dec
Budget and Money Tracking Best Practices
Budget Reports
Money Tracking
FAQs
Troubleshooting Guides
Cannot Edit Production
Scenes/Characters Missing After Breakdown
Unable to Sync
Missing Photos
Miscellaneous Groups Don’t Match
Bag Tag Printing Skips Labels
Reports Skipping Pages
Editing the Name of a Script Revision
Web Browser is Slow
Product Updates
AssetHub
Getting Started
Managing Assets
Creating Assets
Creating Assets by Exporting Inventory from SyncOnSet
Creating Assets Manually
Creating Assets with Asset Import
Reconciling Single Transactions as Assets
Reconciling Journal Entries
Handling Returns
Bulk Reconciling Transactions
Bulk Updating
Excluding Transactions
Splitting Transactions
Splitting/Duplicating Assets
Merging Assets
Adding Photos to an Asset
Uploading Documents to an Asset
Choosing the Correct Disposition
Creating Storage Locations and Sub Locations
Additional Features
Running Reports (Asset Pages, CSV, PDF, Asset Disposition Report)
Searching and Filtering Assets
Creating, Editing, and Deleting Characters and Sets
Moving Assets Within AssetHub
Managing Groups
Trashing Assets
Requests and Approvals
Accessing AssetHub on a Mobile Device
Using Barcodes with Assets
AssetHub Best Practices for COVID Compliance
Features and Series
Accounting
Accounting Onboarding
Locking Currencies
Exporting Asset Reports from SmartAccounting
Exporting Asset Reports from Global Vista
Exporting Asset Reports from PSL
Uploading Ledgers
Matching Columns
Handling POs
Production Coordinator
Crew
Adding Project Users and Managing Permissions
User Permission Levels
Studios and Divisions
Creating Division Assets
Managing Events
Adding Studio Users and Managing Permissions
Customizing Fields Within Departments
Troubleshooting Guides
Webinars
All SyncOnSet Webinars
Introduction to SyncOnSet Continuity Web: Script Breakdown, Revisions, Linking and Deleting Characters
SyncOnSet Continuity Web for Costume
SyncOnSet Budgeting for Costume
Advanced SyncOnSet: Best Practices & Pro Tips
SyncOnSet for Production Coordinators
SyncOnSet Continuity for Episodic Teams: Block Shooting & Cross-boarding, Characters, Actors, and Inventory
SyncOnSet 5.0 Mobile App: Navigation, Uploading and Tagging Photos
SyncOnSet Continuity Hair & Makeup
SyncOnSet Continuity for Set Dec: Using the Mobile App
Budgeting & Money Tracking for Costumes
Budgeting & Money Tracking for Set Dec
SyncOnSet for Episodics: Season Data Transfer
SyncOnSet for Props: Introduction to Continuity & Budgeting (Web)
Transitioning to SyncOnSet 5.0 Mobile
SyncOnSet for Costumes: Adding Inventory, Changes, and Photos in Continuity Web
SyncOnSet for Students: Intro to Continuity Web
SyncOnSet Continuity Web: Production-Wide Account Basics
All AssetHub Webinars
Introduction to AssetHub 4.0: Demo
AssetHub: Managing Permissions & Adding Team Members
AssetHub: Managing Journal Entries, Returns, Merging, and Bulk Updating
Exporting Inventory from SyncOnSet to AssetHub
Webinars for Costume
Webinars for Hair and Makeup
Webinars for Props
Webinars for Set Dec
Table of Contents
- All Categories
-
- Netflix Wrap Workflow
Netflix Wrap Workflow
Welcome to SyncOnSet
The SyncOnSet platform creates a collaborative environment for teams to leverage from prep to shoot through wrap.
The following guide will walk you through the necessary steps to complete your wrap files in both SyncOnSet and AssetHub.
SyncOnSet
Continuity and Budgeting tools designed to help crews stay organized and keep all of their day to day responsibilities in one place. Leverage SyncOnSet to breakdown a script, add and manage item Inventory, as well as pull reports for continuity and all necessary wrap files. For onset continuity, leverage the mobile app to easily upload continuity photos and notes from your mobile device to be shared in real time with the rest of your team.
Upload Continuity Photos
Sharing continuity photos with your department, production, and Studio is now easier than ever before. Photos can be added during production via the SyncOnSet mobile app or in bulk during wrap. See below for a step-by-step guide to adding your department's continuity in bulk to the production Gallery.
Storage Inventory List
Step 1: Create a Wrap Box
- Click Add.
- Enter the Wrap Box information.
- Click Create to create one box or (+) to create and add another.
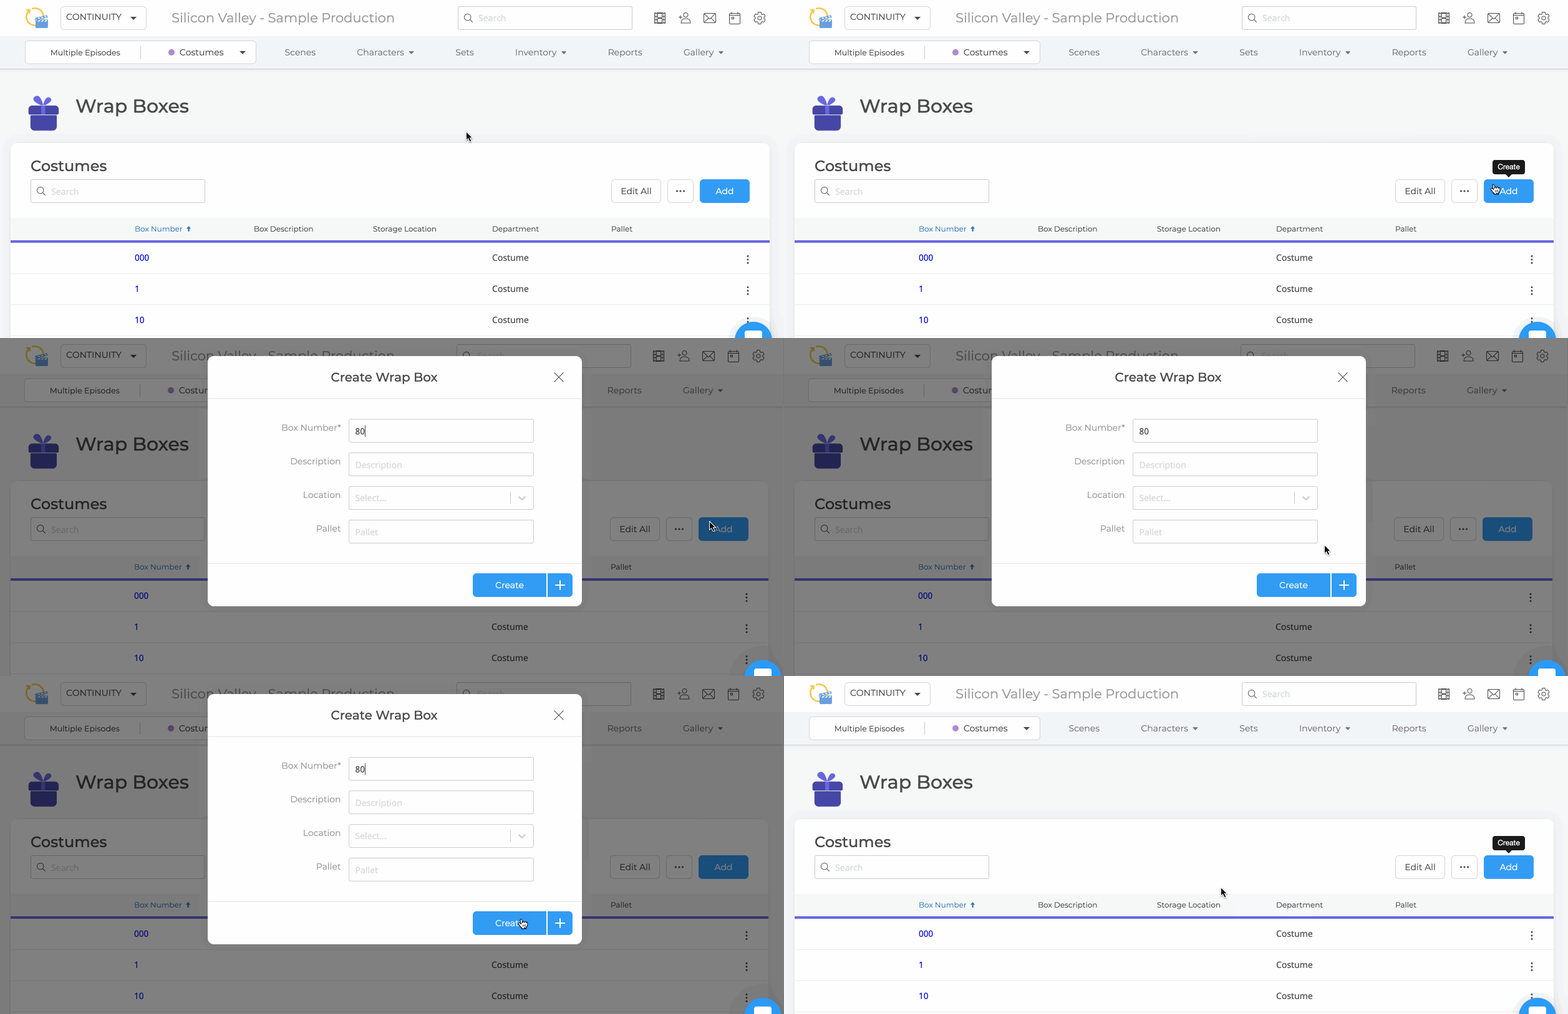
Step 2: Add Inventory to a Wrap Box
Costume
See Add Existing Inventory to learn how to add Inventory to a Wrap Box.
Props / Set Dec
Select a Wrap Box from the Wrap Box Index or search for it in the Universal Search bar.
- Click Add on the Inventory table and select Create New.
- Give the new piece of Inventory the same name as the Wrap Box.
- Use the description field to list all the items to be stored in the Wrap Box.

- Attach Inventory photo(s) to item so they display on reports. To add photos:
- Click the hyperlink of the item you just created.
- Click the horizontal Ellipsis at the top of the sidebar.
- Select Add Photo and upload the photo file.

Step 3: Generate a Storage Inventory Report
The Storage Inventory Reports are available on the Reports Index for all Departments.
Costumes: Select Wrap Boxes Report.
Props: Select the Wrap Boxes Report and check the box to Include Inventory Photos.
Set Dec: Select the Wrap Box Detail Report.
AssetHub
AssetHub is used to digitally archive any item purchased over your Studio's Asset threshold*.
Once accounting has uploaded your department's Asset list, you are now ready to start reconciling. The following steps will walk you through how to reconcile an Asset from start to finish. Once this is complete you can generate a Final Asset Report for production.
*Consult with your Studio directly for its Asset threshold.
Reconciling a Single Asset
Step 1: Update the Disposition
- Click Transactions on the top navigation bar.
- Click on a specific Transaction.
- Select Create New in the expanded row.
- Ensure the Asset Name is clear and concise (rename if needed).
- Click the Disposition * field and select an option from the drop-down menu.
- Click + Photo to upload a .jpeg, .JPG, or .PNG file.
- Click Save.
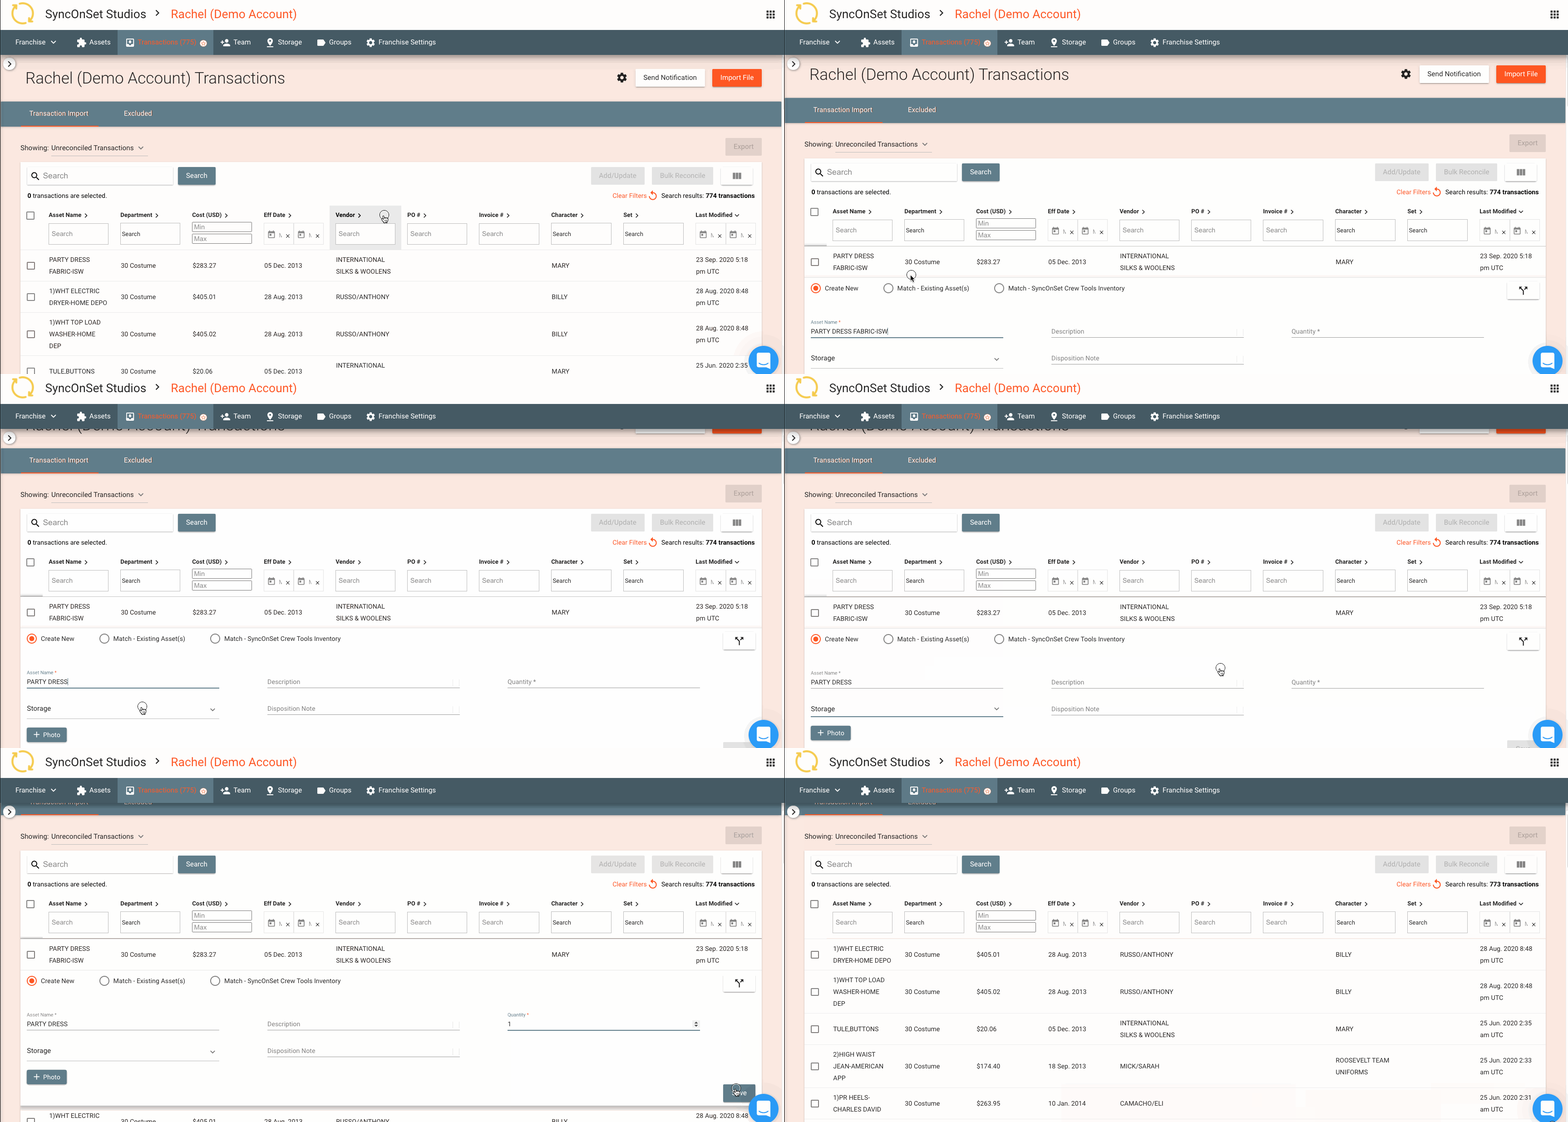
To bulk update: Check the boxes inline with Transactions you wish to update > click Add/Update > select Disposition from the dropdown menu.
- Related Articles: Reconciling Single Transactions as Assets, Bulk Updating, Choosing the Correct Disposition
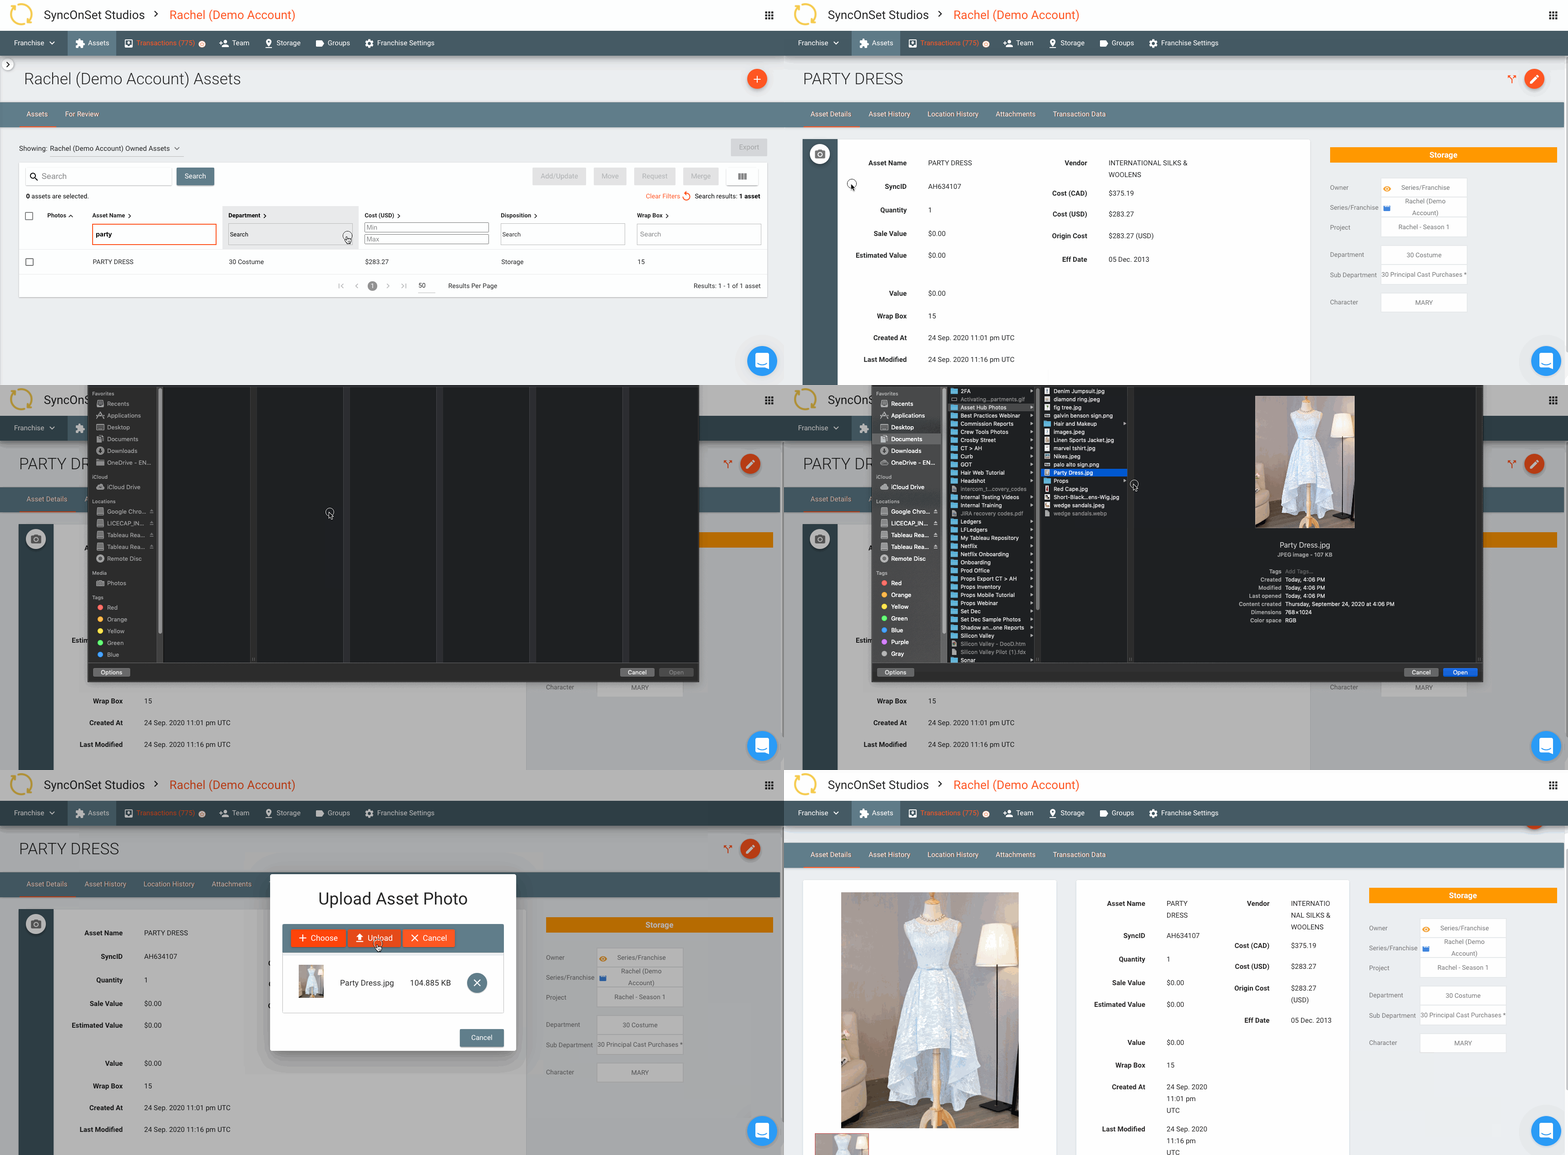
Step 2: Add Photos from the Asset Index
After the item has been assigned a Disposition, it will move from the Transactions page to the Assets page.
- Click Assets on the top navigation bar.
- Click on the item to open the Asset Details view.
- Click the Camera icon in the top left corner to add a photo from your computer.
- Related Articles: How to Add Photos to an Asset
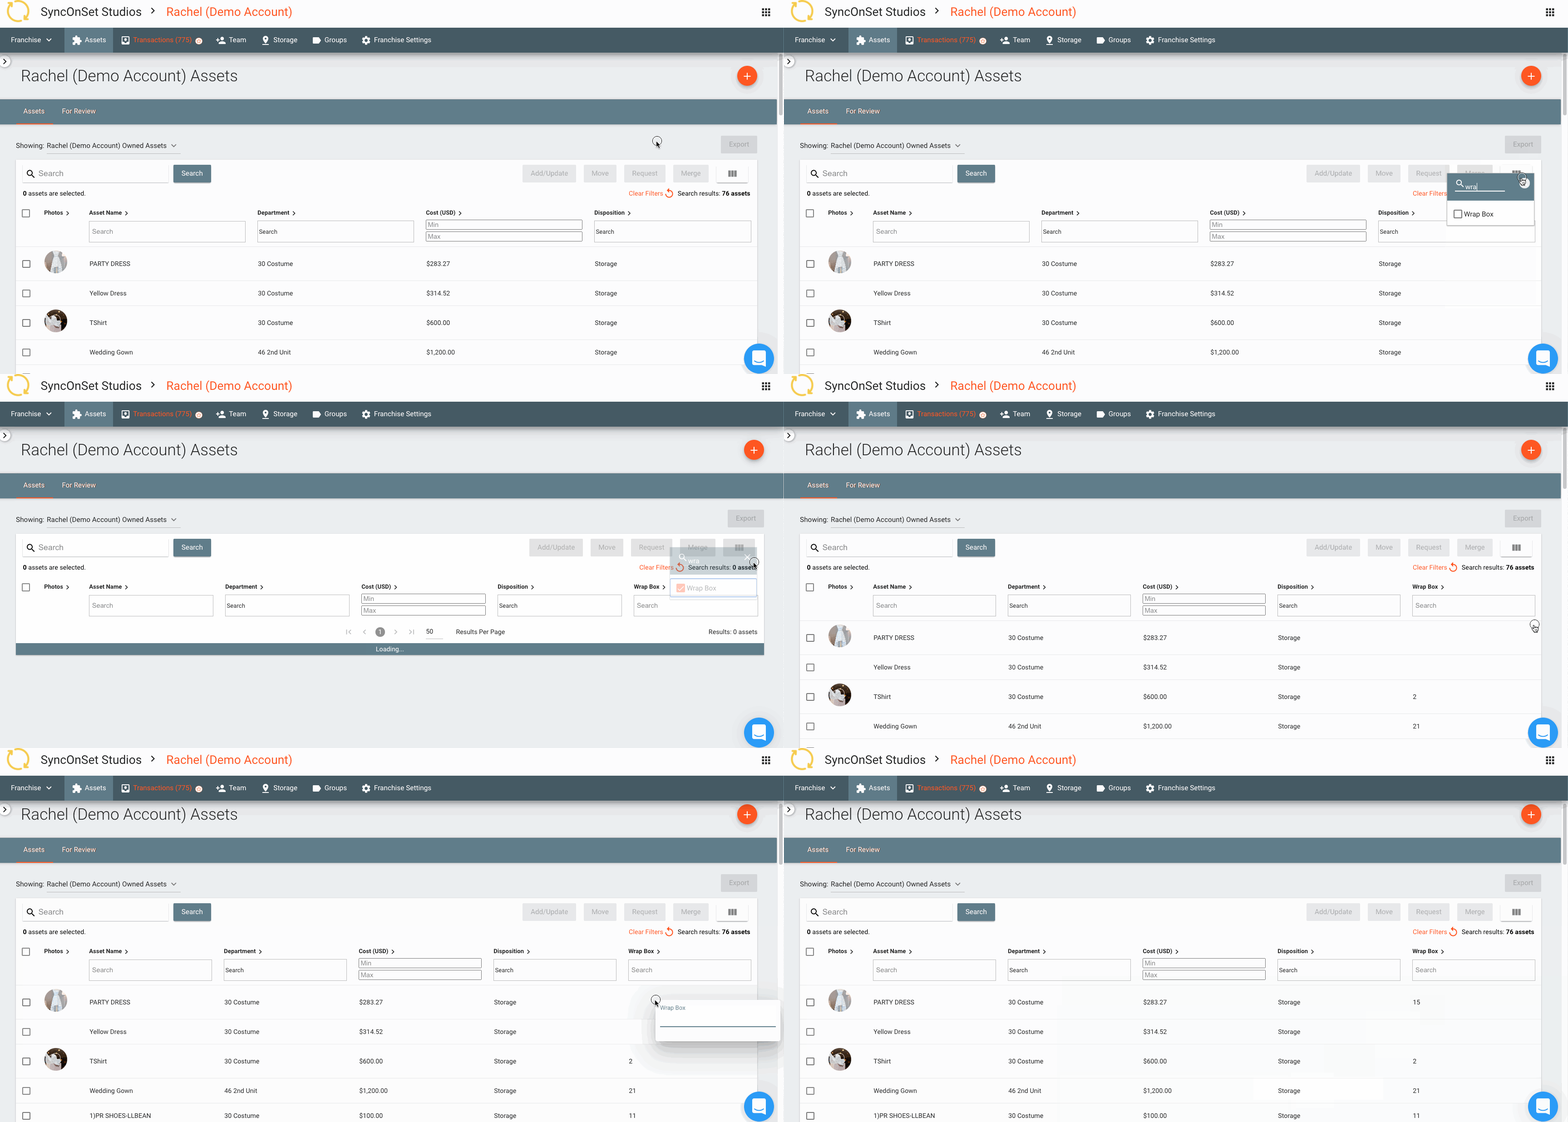
Step 3: Add a Wrap Box / Pallet #
- From the Assets Index, use the Choose Columns icon in the top right corner and check Wrap Box so it is displayed as a column on your page.
- Hold down the Shift key and click the empty space where the box numbers will display.
- Add the wrap box or pallet # and press Enter.
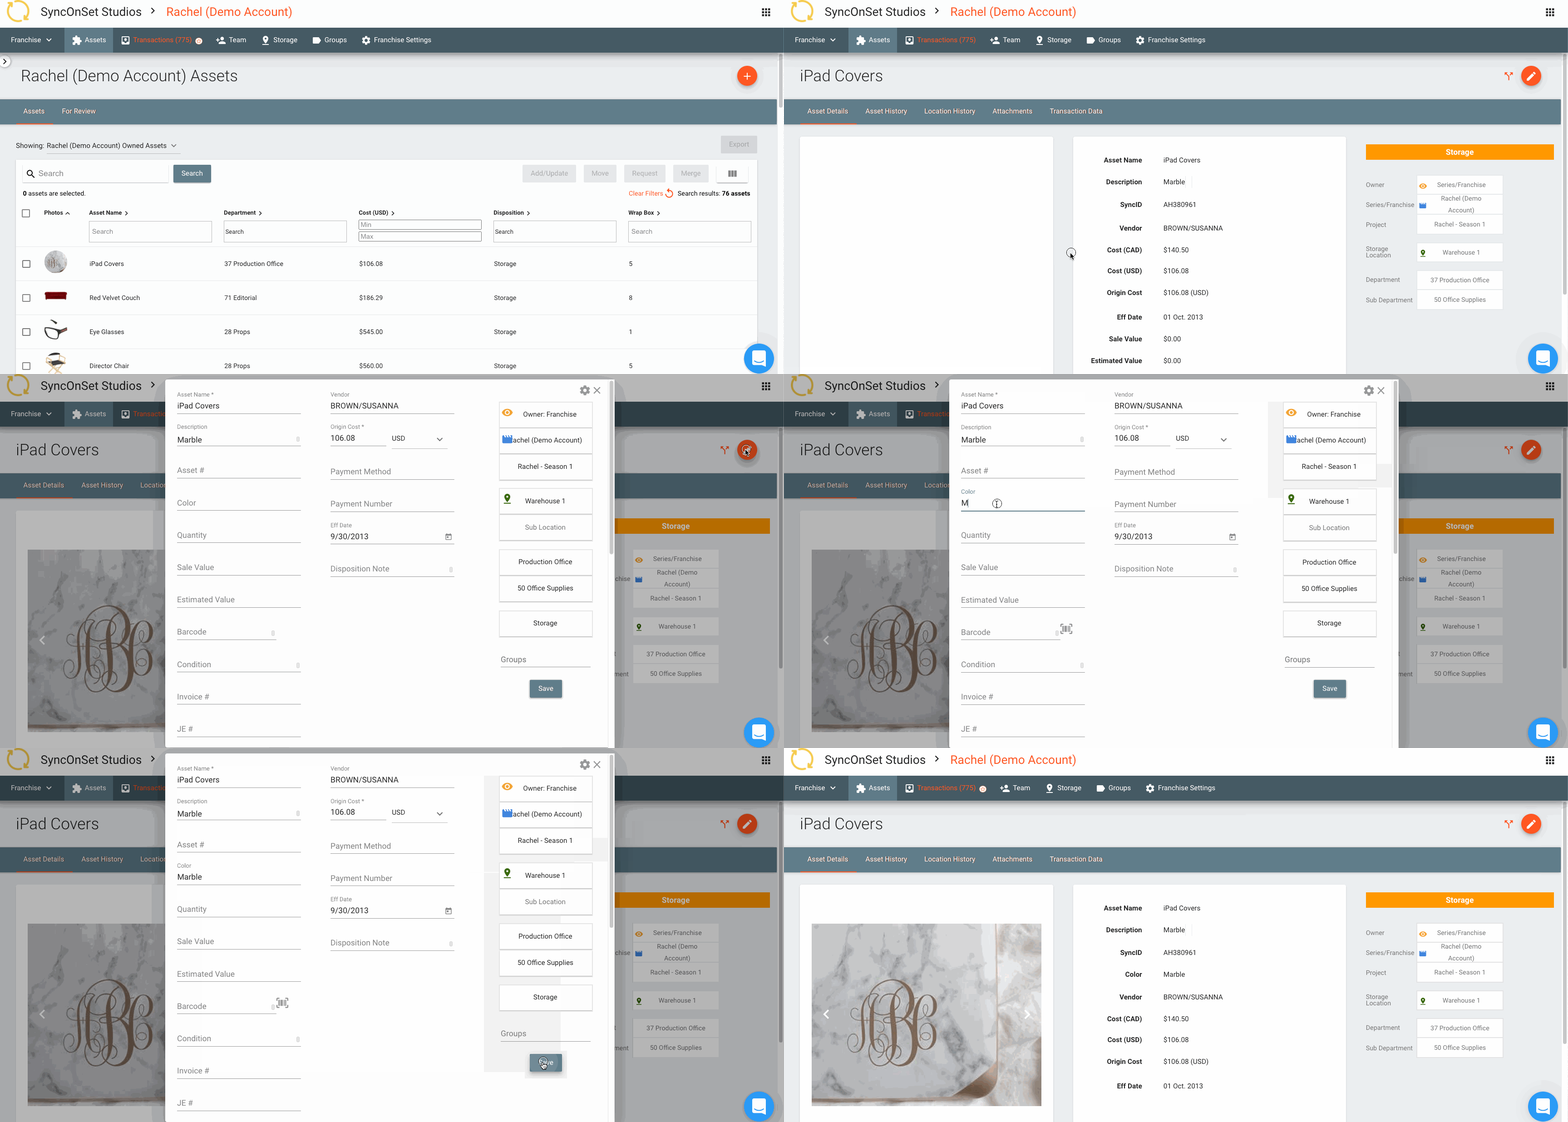
How to Update an Asset
- Select the item from the Assets Index and it will bring you to the Asset Details.
- Click the orange Pencil icon in the top right corner to edit or update the item's additional fields.
- Click Save.
- Click Assets on the top navigation bar to return to the Asset Index.
How to Handle Returns
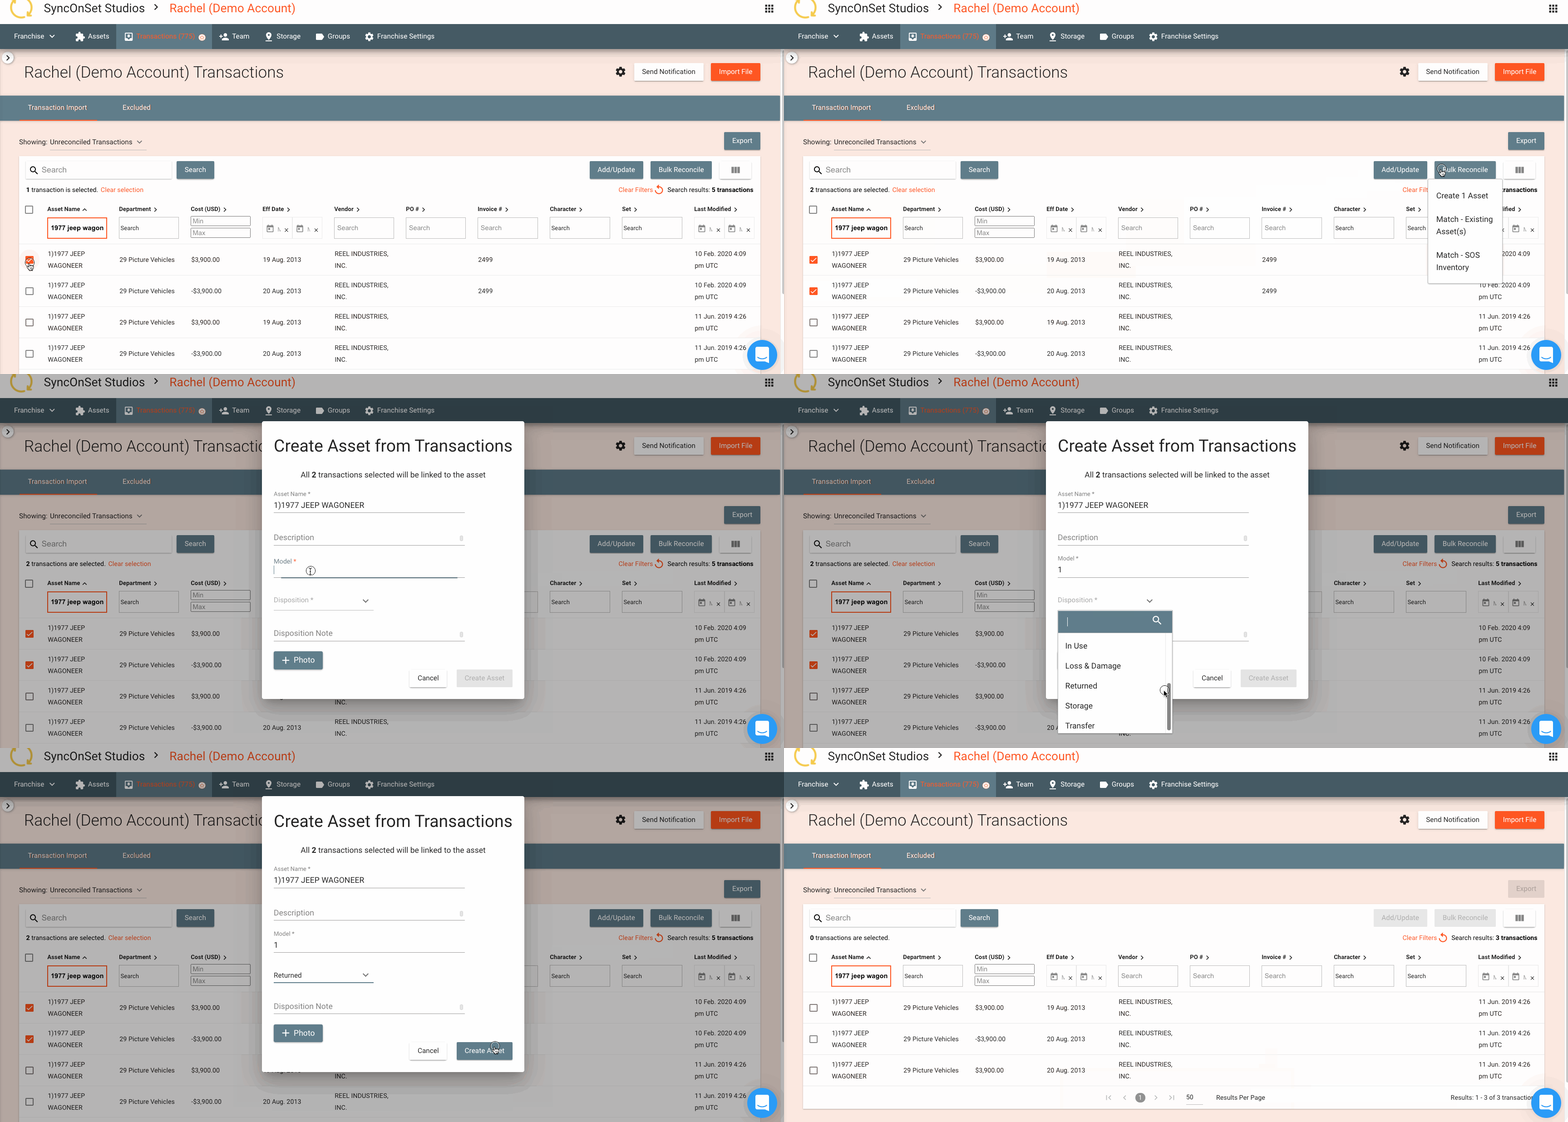
- Locate the "in" and "out" (positive - and negative - amount) Transactions.
- Checkmark both Transactions using the boxes on the left side.
- Click Bulk Reconcile > select Create 1 Asset.
- In the pop-up window, include information about the Asset and set the Disposition as "Returned". Then click Create Asset. A notification will appear at the bottom of the screen to confirm that the Asset has been successfully created.
- Repeat these steps for each positive - and negative - amount Transactions you have. If you have multiple positive - and negative - amount Transactions for the same Asset, checkmark all of them before clicking Bulk Reconcile.
- Related Articles: Bulk Reconciling Transactions, How to Handle Returns
Generating the Final Asset Report
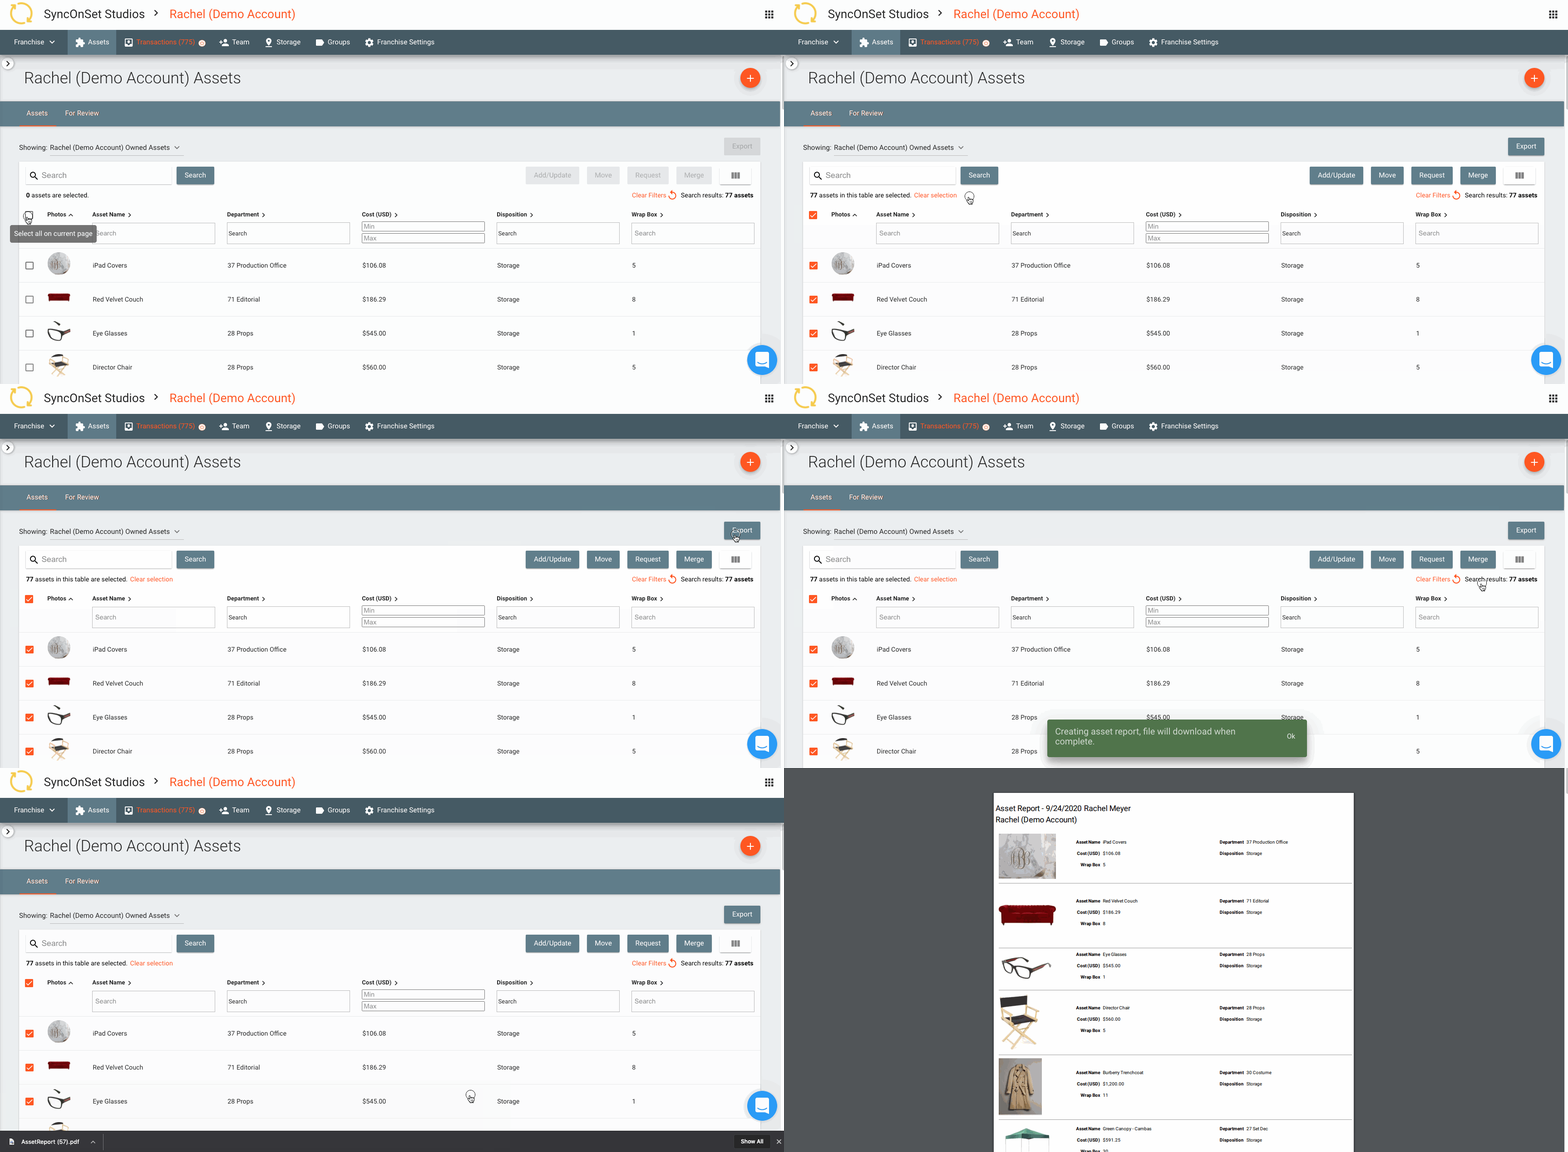
- Use the Choose Columns button to select all of the fields you'd like visible on the report. You can also drag the columns to change the order in which they are displayed on the report.
- Select all the Assets you'd like to see on the report.
- Click Export > PDF. The file will download once it finishes generating.
- Related Articles: Running Reports (Asset Pages, CSV, PDF, Asset Disposition Report)
